|
01/15/15
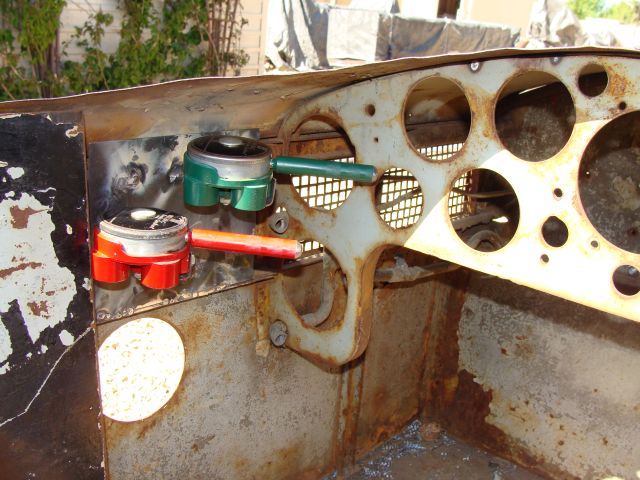
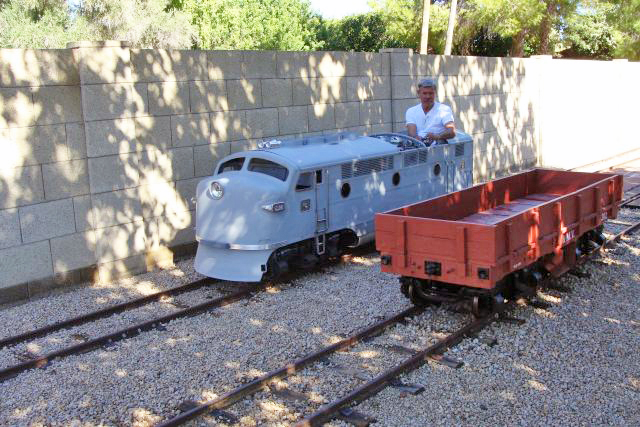
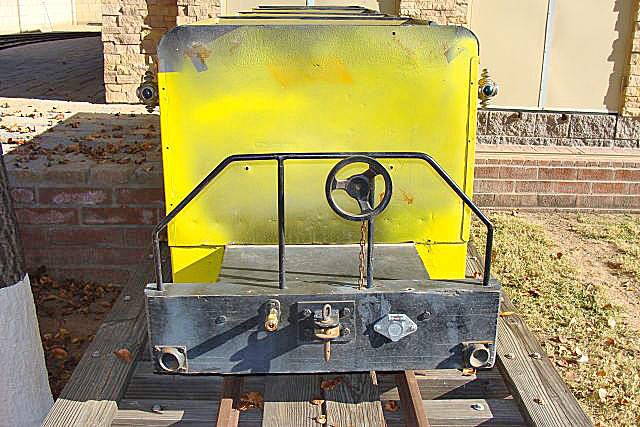
With the holidays and with some seasonably cold and wet days in December, shop time was at a premium and outside time even more rare. The time we had was primarily focused on three projects: our G16 B unit, track inspection car and our 1987 John Deere AMT 600. We fabricated and installed the upper and lower brackets for mounting the hood struts on our B unit. We also fabricated the hood catch. We are finishing fabricating a spacer bracket for mounting our hood release. We built the prototype for our hand valve mounting brackets. In the next couple of weeks, we will fabricate the ones that will get mounted in the cockpit.
|
|
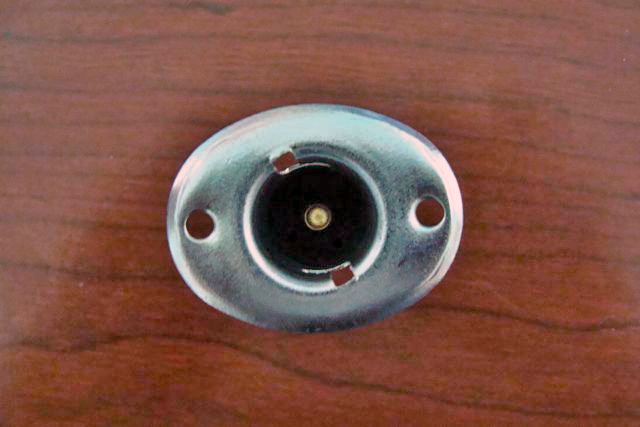
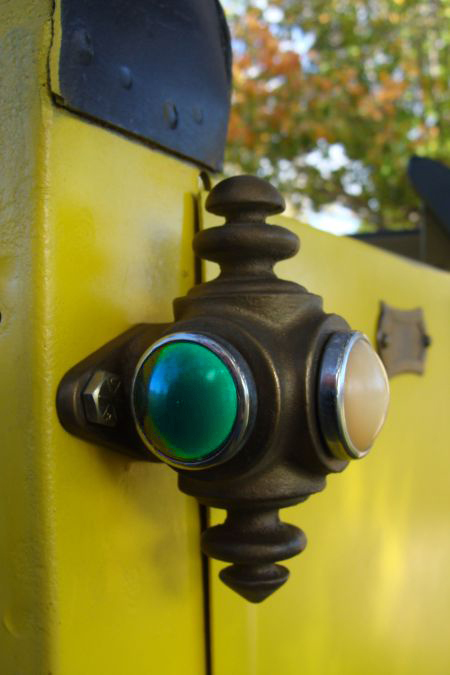
We drilled the holes for mounting our 6 pin electrical connectors in the front of the B unit. Just like we did on the A unit, we enlarged the holes that held the original electrical connectors. It is a clean look and they will match up just as they did originally.
We also drilled the holes for mounting a 6 pin electrical connector at the rear of the B unit. Instead of running wires tied to the rear coupler of the B unit, we will utilize the 6 pin connector and a pig tail wire bundle when connecting with the electrical in our coaches. We have utilized this approach with each of our S16s with great success.
We also spent some time welding numerous unnecessary holes closed; there are still several more holes that need the same treatment.
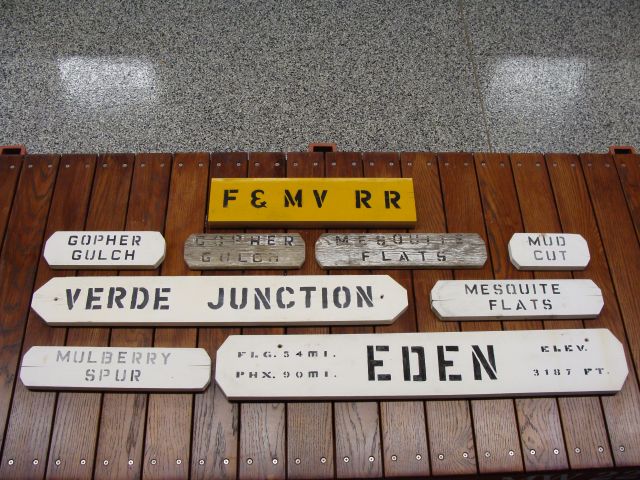
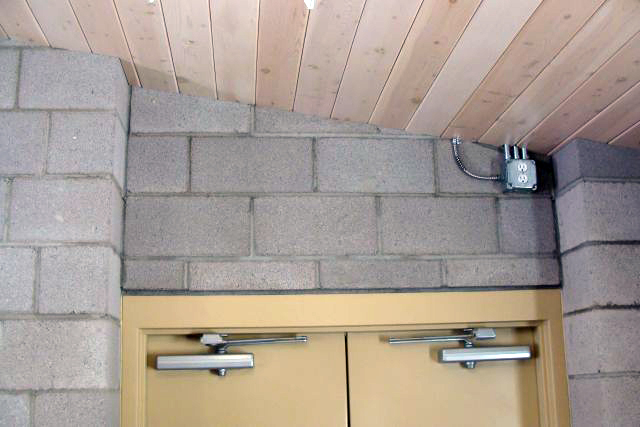
We continued our work on widening the seat on the track inspection car from 21 inches to 30 inches. I salvaged the seat back plank that Malcolm Mackey had lettered for the F & MV back in May of 1993. I trimmed it down so the letters are centered on the remaining wood plank and it will be part of an F & MV sign display that I hope to have in place in the engine house in late 2015.
|
|
We drilled the new larger wood planks and drilled the angle iron frame to accommodate them. We mounted the wood planks and they look pretty good. We will fill the original holes in the angle iron with bondo and after sanding and painting, they will not be visible. We also repainted the wheels, repainted the front and rear couplers and the drawbar. We got a second coat of yellow on some of the car and will finish painting the yellow sections in the next week or two if the weather cooperates. At some point soon, the exhaust will be replaced and we are exploring those options.
|
|
|
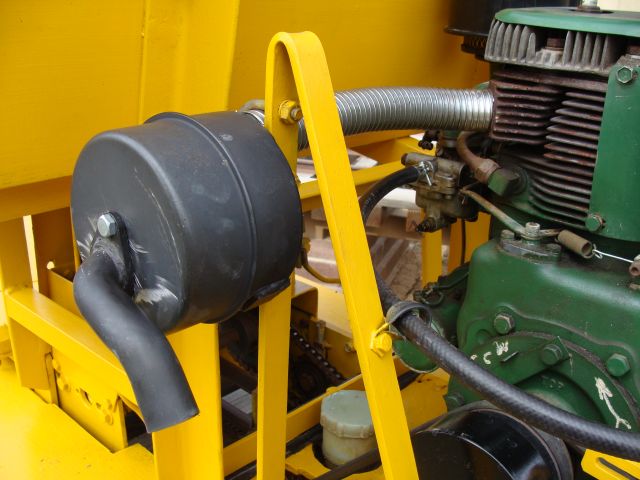
We spent quite a bit of time this month doing fabrication work on the John Deere AMT. We fabricated a rear bumper and mounting brackets. This year and model AMT (1987 AMT 600) didn't originally come with a rear bumper so it took quite a while to figure out what we wanted the bumper to look like and how high we wanted it to sit in relation to the tires. Then we determined the best place and way to mount it to the frame and what those mounting brackets would look like. I also had tracked down some brake lights and turn signals off a slightly newer John Deere AMT 626 that I wanted to incorporate into the bumper design. After we had all the dimensions and our design roughed out in our heads and on paper, fabrication started. I still have some grinding and filing to complete, but it is really taking shape. I fabricated a little trailer hitch that looks just like the JD original and it is mounted on the bumper. The rear bumper will be painted John Deere yellow once we get it finished. The top of the bumper is also just the right height to serve as a step when the tailgate is removed and a person is stepping into the box to sit on the seat.
|

|
We also fabricated side rails that we designed to match the look of the rear bumper. They are mounted on the rear box. I have some grinding and filing that remains to be accomplished on the side rails too. They will be painted John Deere Green once they are completed.
|
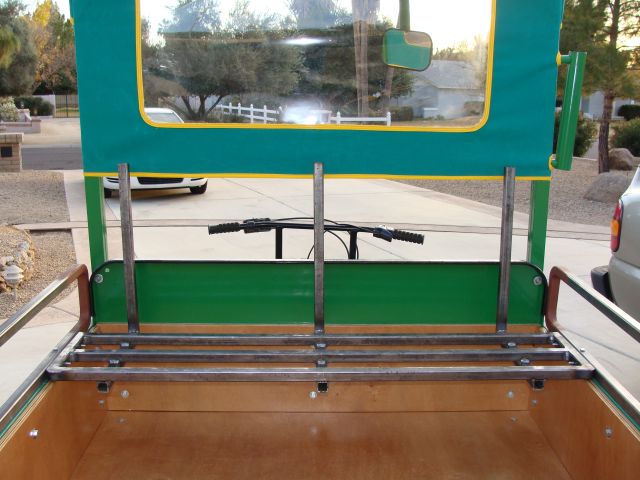
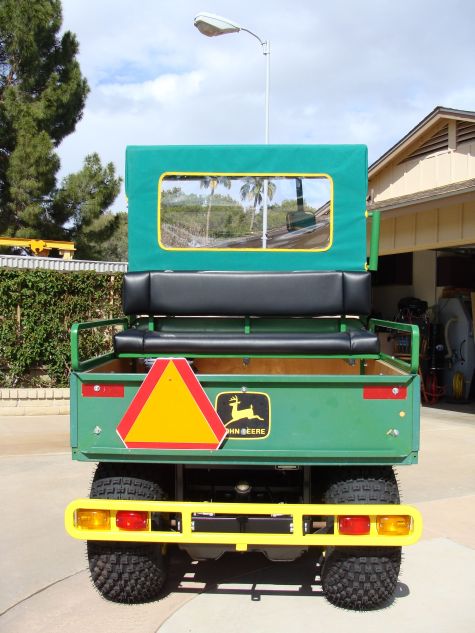
For years, two planks that spanned the rear box served as our bench seat when transporting people on the F & MV. It was a pretty rough ride if we were going very far. I figured we could take the bench seat idea a step farther. We fabricated a steel seat bottom and braces for a back to the seat. I still have to determine the right height to cut off the braces for the back, buy and cut the plywood and talk my next door neighbor into tackling another one of my upholstery projects. The seat fame will be John Deere Green while the bottom and back will be black like the driver seat and pad.
|
I also have started work on fabricating mounting brackets for a pair of hood struts to mount under the box to assist in tilting the bed back to access the battery, engine, clutch etc. All the weight I have added to the box has made it a two person job to tilt the box and I would like it to be a one person job. After all the fabrication work and painting is completed, we will still have the electrical work to complete. It might be a little crazy making all these modifications to the AMT, but it is a fun project and I know she will be one of a kind when she is completed.
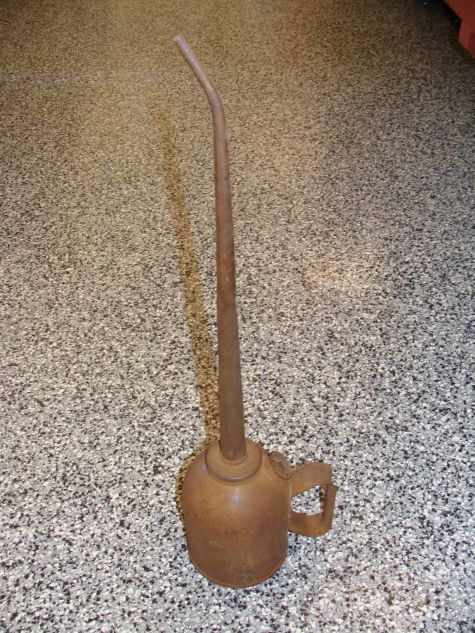
We were gifted a cool long spout oil can for our engine house collection; thank you Marion.
|
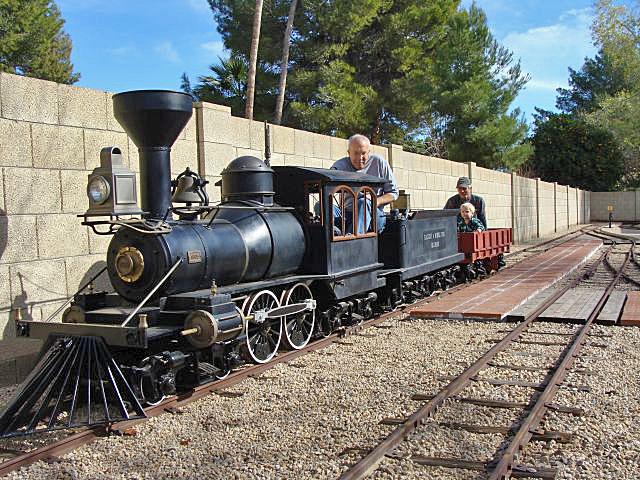
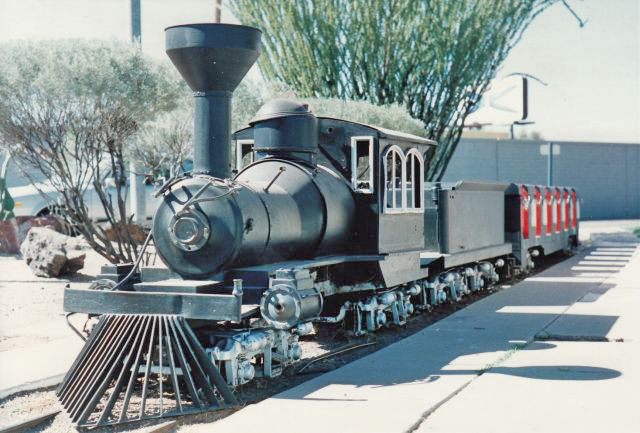
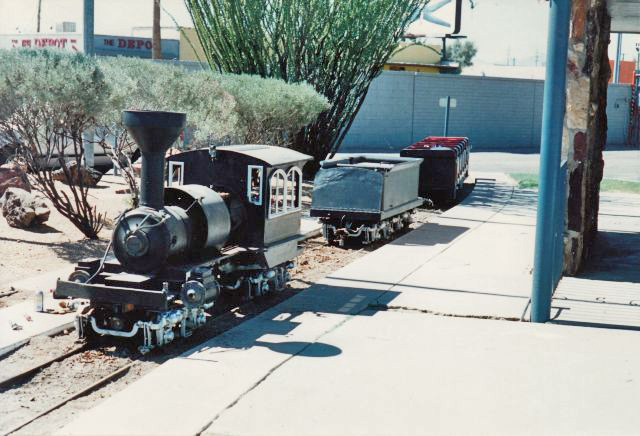
We had No. 582 out on two different weekends during the month and Dave and I both took a great deal of video footage. A new video of No. 582 is in the works and we hope to post it in the next few weeks.

|
|
I am working on the 2014 Arizona and Pacific Railroad annual report and I hope to have it posted by the end of January.
Happy and safe railroading everybody.
|
|
01/20/15
We came across some video we shot of the initial shakedown run of G-16 #582 that we edited and posted on the video page. More recent video we shot is still being edited and will be posted later.
Click here to see the A&P RR video page
01/29/15
We issued our 2014 annual report. It can be seen here
02/22/15
As with the past couple of months, our emphasis this month was primarily on the G-16 B unit and the 1987 John Deere AMT.
We got the B unit hood struts mounted; we used the same struts as on the A unit. We fabricated a spacer bracket for mounting our hood release and got it mounted as well as the release cable and hood release handle in the cockpit. We changed the design and fabricated a new hood catch as our first version was not all that I had hoped. The new and improved version is reliable and opens and closes smoothly; the hood alignment is great. We built the prototype for our hand valve mounting brackets. In the next couple of weeks, we will fabricate the ones that will get mounted in the cockpit.
|
|
|
We completed the layout for the side skirt panels and purchased the material. There are two 90 degree bends and we will need to have them bent for us. They, along with the gas tanks, are really an integral part of the look and I want the skirts to fit perfectly.
Dave built the pair of sheathed wire bundles that run the electrical from the A to the B unit. We also started work on, but did not finish, the quick release vacuum lines that connect the A and B unit.
|
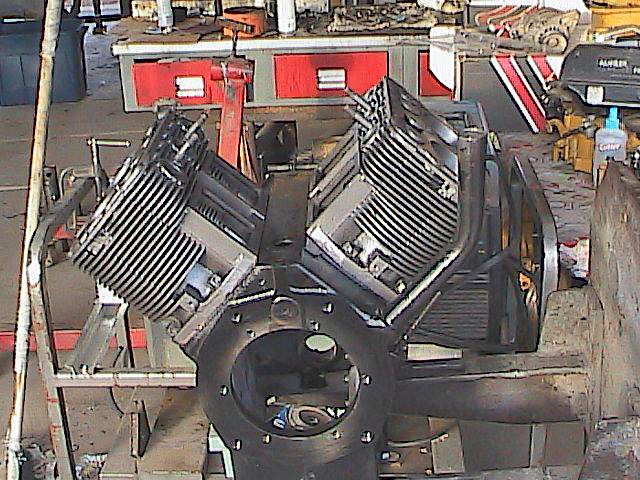
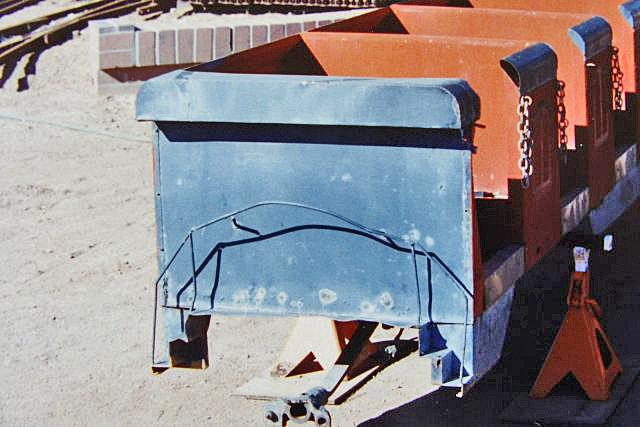
We have never been completely happy with the vacuum output from our original G-16 vacuum pump in the G-16 No. 582 A unit. We decided to pull it out and see if we could rebuild it. That is when the adventure began. We realized there isn't room to remove it out through the top opening. We thought maybe if we removed the front nose skirt that we could get it out through that opening - nope. We had to remove the front skirt, the front driveline, disconnect the safety hooks, jack up the body and roll the front truck out from under the G-16 body so that we had enough room to remove the vacuum pump from underneath. Any of you that have a G-16 know just how much work and how long the process I just described takes to complete.
Once we had it out, our friend Jerry Graves took it to his shop and rebuilt the pump with new bearings and a new diaphram. As it turned out, the original diaphram had a hole in it and the bearings were shot. Then we repeated the process in reverse order to get the vacuum pump back inside the G-16 body and remounted. Wow, what a difference it has made!!! It produces vacuum now at almost twice the rate that it did previously.
We made a little bit of progress on our track inspection car exhaust project. The exhaust needs replaced and re-routed to the rear and down. We acquired another small muffler and some flexible exhaust pipe and we hope to get that project completed in February.
One of our friends from Salmon, Idaho, Bob Earhardt, stopped by during the month. We had spoken over the phone and via email for a few years; it was great to have Bob stop by for an afternoon.
|
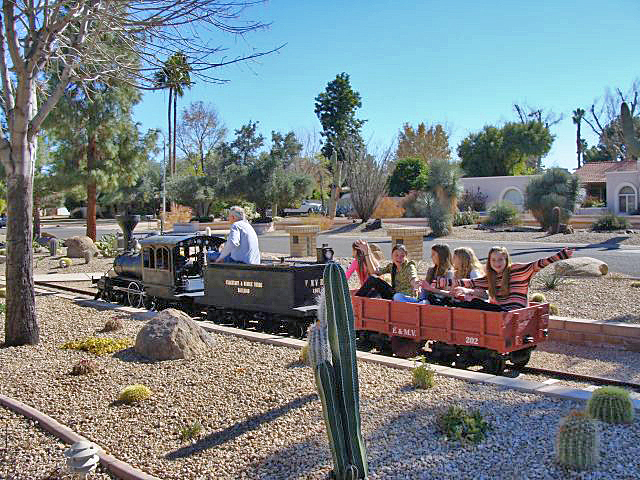
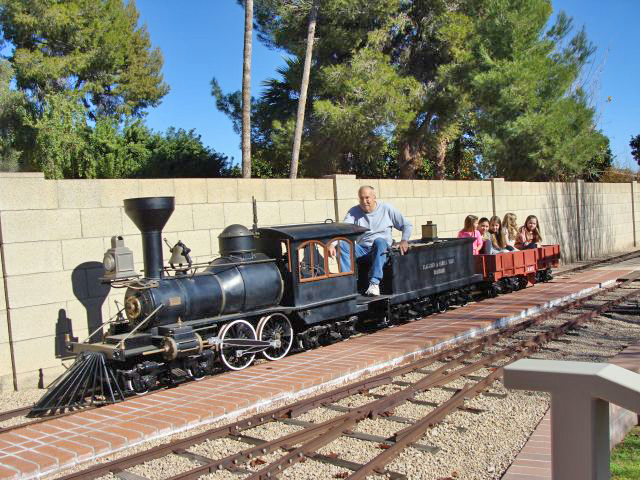
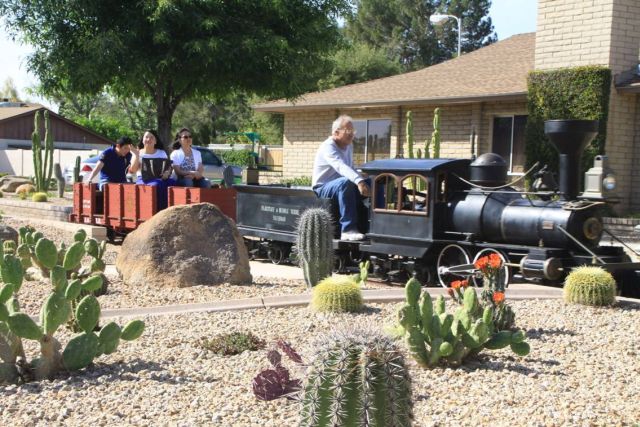
A neighbor was having a birthday party for her 11 year old daughter and her friends. She asked if the girls could come over later in the day and have a couple of train rides to which I agreed. They had a great time. Who says only boys like trains. Interestingly, boys at that age are asking me how fast it will go. Girls are asking questions about fuel, pressure and where was the water held on real steam locomotives. They were all talking about sharing the details of their experience with their teachers and classmates on Monday. We may have won over a few more large-scale railroad fans.
|
|
We started work on adding another small brick observation area to display more of our full size railroad collection in the months ahead. We re-rerouted the sprinkler pipe, moved several lantana bushes and started the initial brick work. We'll finish it in February.
|
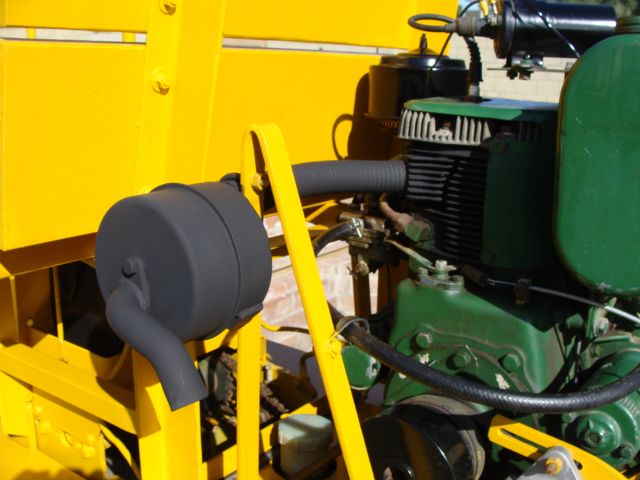
We got the AMT bumper that we fabricated last month prepped, primed, painted and installed. We will install the brake lights and turn signals next month. We also got the side rails that we fabricated last month for the rear box prepped, primed, painted and installed. After some trial and error, I determined the right height to cut off the braces for the rear bench seat that I am working on. I also bought and cut the plywood for the lower seat as well as the back support portion. My neighbor is a high end auto upolsterer who had a number of custom street rods with his work recently appearing in the local Scottsdale car auctions. He is also a good sport and has agreed to tackle another one of my upholstery projects. The seat bottom and back will be black like the driver seat and the metal frame will be John Deere Green.
|
|
|
The Tucson and gon number no. 202 saw the majority of the action on the rails during the month. The Tucson really ran well. The gon will have an intermittantly troublesome wheel and axle set replaced next month with one of the ones that we rebuilt over the last year and a half. It is unclear to me at this point if problem is the wheels, axle or a combination of the three. We will simply swap the assembly out for now and rebuild it during the summer when it is too hot to be outside working on projects.
|
A friend of mine has been very helpful in helping me track down a number of the parts that we were missing on our G-12 No. 377. He is looking for a MTC or AH crossing signal for his railroad. If any of you have one that is for sale or if you come across one, please let me know and I will pass the information along. Thank you.
Happy and safe railroading everybody.
03/04/15
It was another very busy month on the A & P. We have to make the most of the Winter months as after Memorial Day and until October 1, it is brutally hot out here. The Tucson, Red River, Coconino and track inspection car saw action during the month.
|
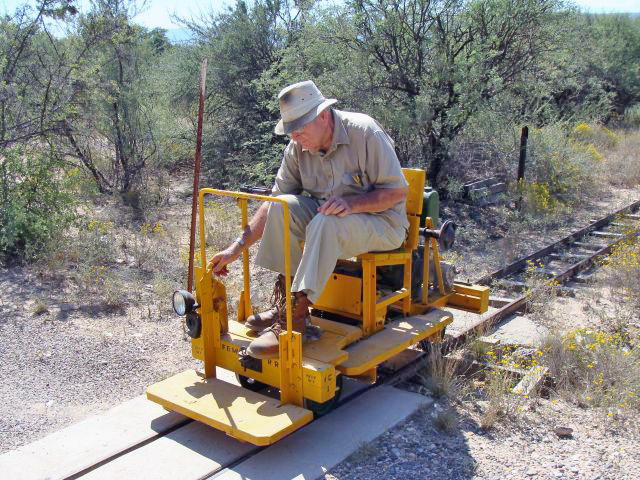
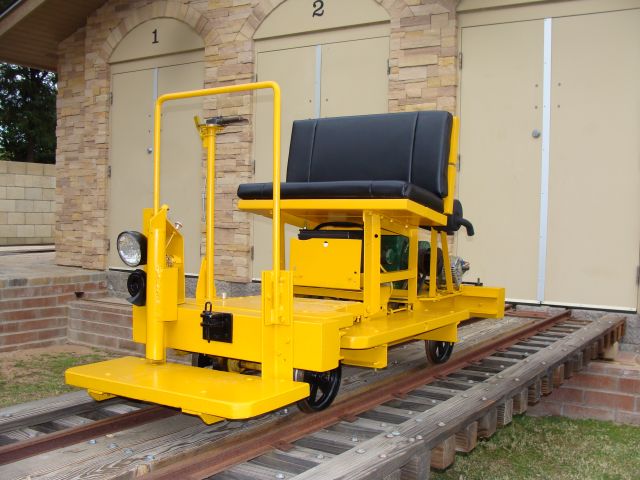
We finished the last of several projects on our track inspection car. When Malcolm built it back in 1993, he made the seat wide enough for one person. There was room to make the seat several inches wider to match the width of the car, but at the time it seemed unnecessary. Over the years, it became pretty clear to both of us that it would have been more functional at open houses and other events if the seat was wider. We talked about widening it several times, but it always seemed like laying additional rail, rebuilding a carburetor or transmission or some other more pressing project was the priority. We just never got to that project.
|
Three months ago, I bought the wood and we slowly made progress widening the seat by 9 inches to match the overall width of the car. After the wood was replaced, we painted the entire car including the wheels and couplers. We replaced the exhaust pipe and the muffler and rerouted the exhaust down and to the rear instead of the original just straight out to the side. We got a good coat of high temp header paint on the new exhaust components; it looks good and is slightly quieter. My neighbor finished his work on padded cushions for the seat and seat back. Thank you, George. It will make the ride a bit more comfortable as with the 1 cylinder engine mounted directly to the frame, the ride was a little rough. I also like the way the seat looks. I also replaced the battery a couple of months ago. This completes the contemplated projects on this piece of equipment.
|
|
|
|
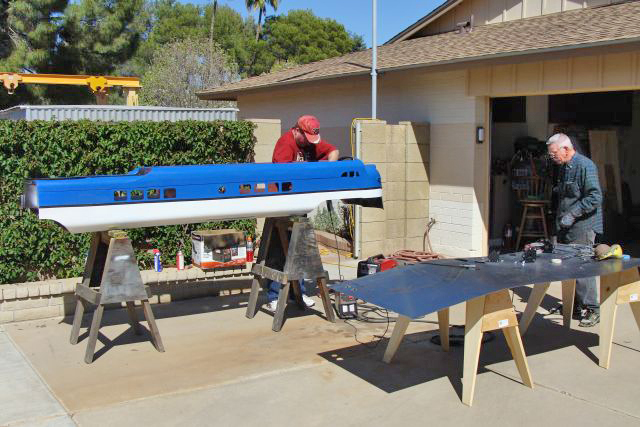
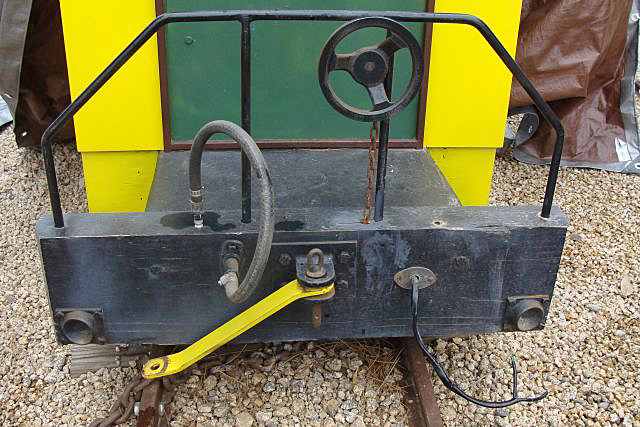
We made some progress on the G16 B unit this month. Work on the aluminum gas tanks continues. I had aluminum patches welded to fill a gaping hole in the back of each tank and we have straightened most of the bends and dings. We still have a little more work to go before I will be completely happy with the tanks, but we have made a good start. We installed our side skirts and they came out just great. We installed the gas tanks briefly for fit and for a photo opportunity. The side skirts and the tanks really make the look of the A and B units from the sides. We started on the valve (throttle and brake) mounting brackets and built prototypes. We will finish them and our work on the instrument panel next month.
|
|
We cleaned sticky fuel deposits from the carburetors on the Tucson and the Coconino again this month. Jerry Graves has what sounds like a great idea to deal with our poor quality gas out here. We have tried various fuel additives without a great deal of success. We'll give his idea a try in the next couple of months and if it works, will share it with you. We also replaced the battery on the Red River. Batteries generally last 2.5 to 3.5 years out here whether they are in your car or one of our trains. We replaced an axle and wheel set on gon no.202. We will determine if the problem is the axle, wheels or both and make the repairs this summer when we are looking for projects we can complete in the shade. We also finished the additional brick patio display area that I started a month or so ago. It is ready to display additional railroad items. I replaced two and added two additional fire extinguishers to the engine house bringing to six the number we have in there. I also have two in the original engine house with the G16 and two more in the garage with the AMT. With so many pieces of older equipment, I just feel more comfortable having the extinguishers just in case I might need them.
|
We found some additional information on our MTC G-12 No. 377 this month. She was shipped new from Renssalaer, IN in Aug. of 1950 to the Bel-Air Drive-In in Detroit Michigan. It was the first drive-in in Detroit. The G-12 proved so popular, that on May 7, 1951, it was joined by a G-16 Suburban No. 558. The drive-In held 1800 cars and was a single screen operation when it opened on August 25, 1950. It closed in 1986. We added No. 377 to our Train Order Board as an arrival. Click here to see the trainboard on our front page
We purchased a G-12 power truck and three coach trucks this month. We also located many of the other components that we were missing like the gas tank, horn relay and horn, throttle handle and trim handles. Thank you Mark, Ben and Jeff for all of your help.
We still need the short drive line, AK, AKN or BKN motor, some of the brake linkage and new brake shoes, but the list is much shorter and we will keep looking. Dave bought the Stewart Warner ammeter and the period switches and push buttons for the dash and I have a set of faux horns for the hood.
We are getting closer to having the 1987 John Deere AMT completed. My neighbor finished upholstering the seat for me and I got it installed this month. It looks and rides great - definitely a one of a kind item for John Deere. I also installed the brake lights and turn signals. The wiring still needs completed, but it is getting closer.
|
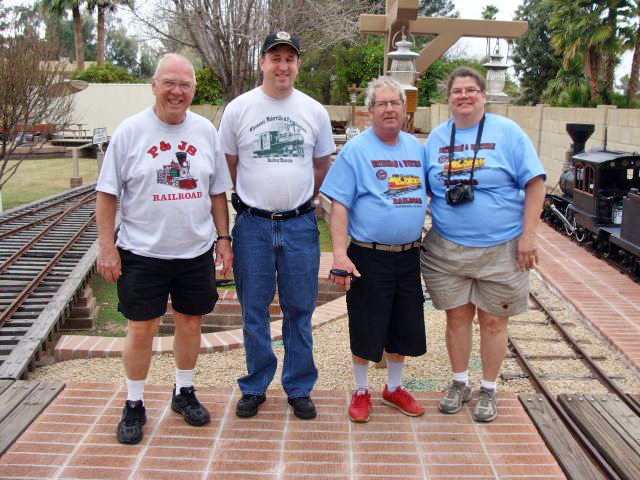
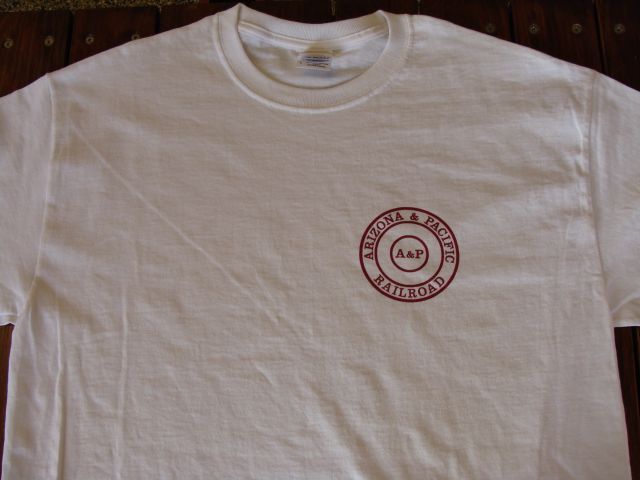
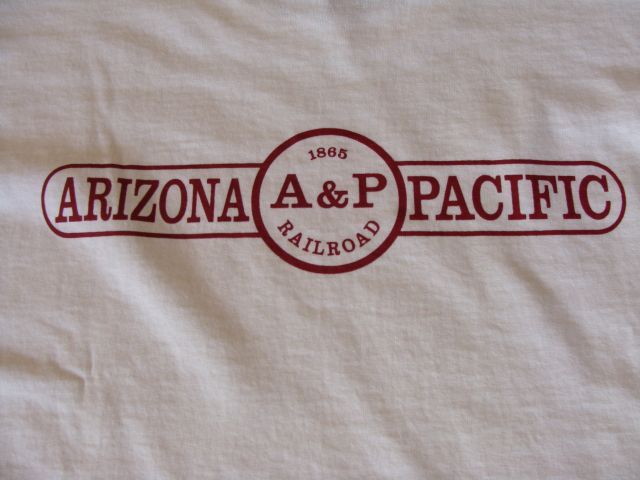
Pete and Char Robinson of the Watermann and Western Railroad in Watermann, IL and Jerry Steibring of the P and JS railroad nearby visited this month. Pete and Jerry had been to the A & P last year, but it was the first visit for Char. Pete and Char brought us T shirts with the A & P logo on them and also brought us some amazing graphics that we will be applying in the months ahead. How cool is that!!! They also brought us a G16 cockpit seat that we salvaged the stainless cab light shields from and they will be used in our G-16 B unit. The seat will go in the parts building for a future project.
|
|
|
Last year when Jerry and Pete visited, I showed them a pattern I had purchased a few years earlier for a marker lamp virtually identical to those on Sandley equipment. They asked to use the pattern to cast a few of the lamps for their equipment and I agreed. They had the wood pattern cut in half and board mounted, core box constructed and several cast. Jerry worked his magic on the lathe and also made the lenses for the lamps. They brought me a finished pair as thanks for loaning the pattern. They will be on the back of a caboose that Dave and I build one day. They look great. The quality of Jerry's work on this project says a little something about the quality of his work on his G12s, Crown, Cagney and International steamers as well as his gasoline engines.
|
|
Ed Lecuyer from the WW & F RR in Maine was in town and visited the same afternoon as Pete, Char and Jerry. It was great fun having them all here at the same time. It was also Ed's second visit to the A & P. We found three pennants dating from 1961 for Cedar Point that have our No. 2 the Sandusky pictured on them. I just thought they were cool and needed to be part of our S-16 collection. I still have to figure out how to display them.

|
This update went a little long this month, but as you can tell there was a great deal going on.
Happy and safe railroading everybody.
04/09/15
We were able to get quite a few things accomplished this month despite the much higher than normal temperatures. We are generally able to operate and work on the equipment out here until Memorial day which pretty much signals the end of our season until October 1. March set all kinds of records for heat in the metro Phoenix area, but we persevered. It was 97 last Sunday; we don't usually see temperatures that hot until early May. Hopefully the heat will moderate somewhat and we can hang in there for a few more weeks. The air cooled engines don't like the hotter temperatures.
We finished fabricating the valve (throttle and brake) mounting brackets for our B unit. We welded them in place and mounted our valves. Obviously, they will come off again when the B unit is sand blasted, but at this point it is a matter of getting everything to fit correctly. They look pretty good in place.
|
We located two of the correct Cole Hersee sockets and bulbs for the cockpit of the B unit. You will recall that last month we obtained two of the stainless steel light shields with a seat unit from our friends Pete and Char Robinson, but the light sockets themselves were rusted beyond resurrection. With these new sockets and bulbs, the cockpit will be a period match just as it come out of the MTC factory.
|
We have been experimenting with logos on the sides of our two A & P gons. We have one style on the 218 and another on the 219. I will look at them both for a few weeks and see which of the two I like best and the least favorite will be replaced on one of the gons. We also added our logo to the track inspection car. I think it looks great and finishes the major projects that we started on her last year.
|
|
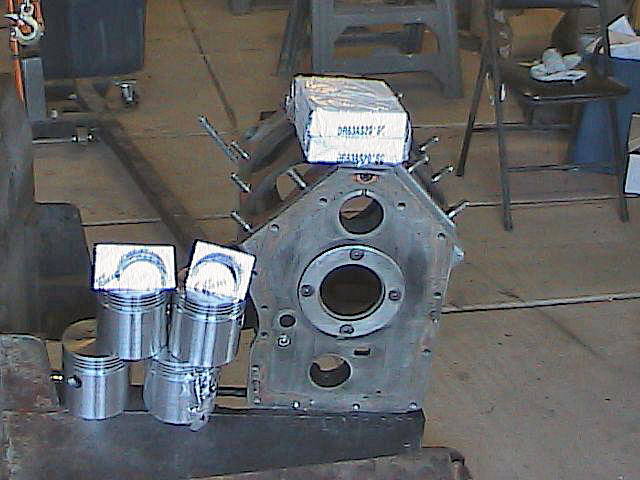
We started doing some body work on the G12 this month - what a massive project this will be. We have taken on some huge projects before both mechanically and sheet metal wise, but this may be the biggest sheet metal project we have ever under taken. Conservatively, at least half of the sheet metal needs replaced. It may turn out to be a lot more than that. It is a mess. One of the prior owners covered the rust eaten panels with duct tape and then covered it with Bondo and paint. In the worst areas, he used duct tape and roofing tar...
|
|
We cut out the front cross member and replaced it. The battery box needs replaced. We cut out the seat back and seat lower and will fabricate and replace both. Much of the floor will be replaced. The gas tank platform is eaten up with rust and will be replaced. The upper side interior panels on both sides are eaten away with rust and will be cut out and replaced. The front bulkhead was all chewed up by the front drive line, but at least it was rust free. It was patched and will be reused.
|
|
|
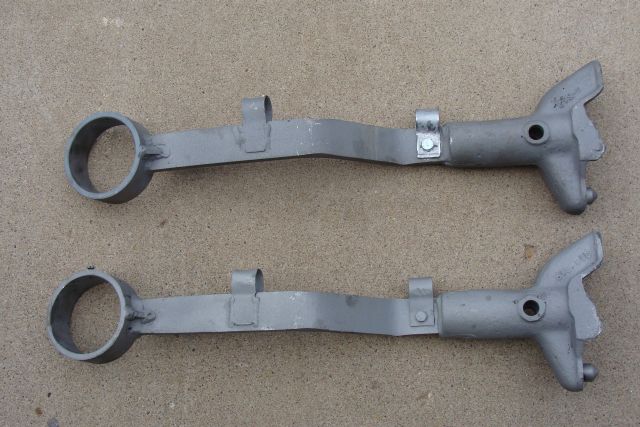
The front truck arch pin assy was badly bent and had a bad crack in the mounting bracket. We straightened the pin and re-welded the bracket.
The throttle control handle assembly will need replaced. We have acquired the parts we will need, but drilling out the rivets and cutting the rusted panels out and replacing them will be time-consuming.
This little unit never did see any TLC and will literally be brought back from the brink when we are finished. If anyone else had acquired this machine, it would no doubt have been cut up for scrap. If I was smarter and didn't get attached to these machines and their rich history, this one would have been a goner.
|
We still need the short drive line, AK, AKN or BKN motor, some of the brake linkage and new brake shoes, but the list is much shorter and we will keep looking. The headlight and socket, green jeweled front running lights and the hood lock knob are the balance of the missing bolt on parts we need.
We had The Red River, Coconino, Sandusky and Tucson out this month. We ran gon 218 behind the Tucson for the first time and they both operated flawlessly. The track inspection car also saw some action this month and the new padded seat makes the ride far more comfortable.
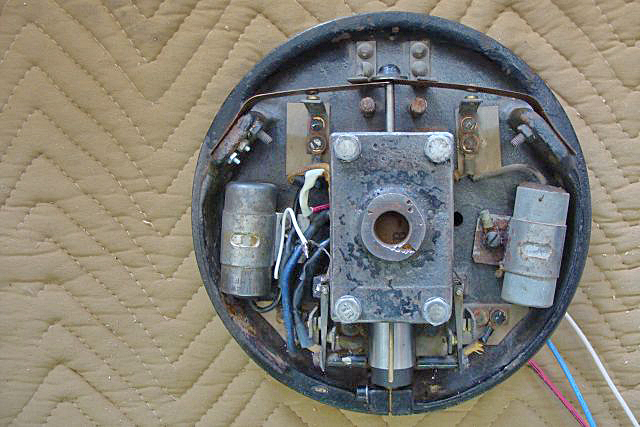
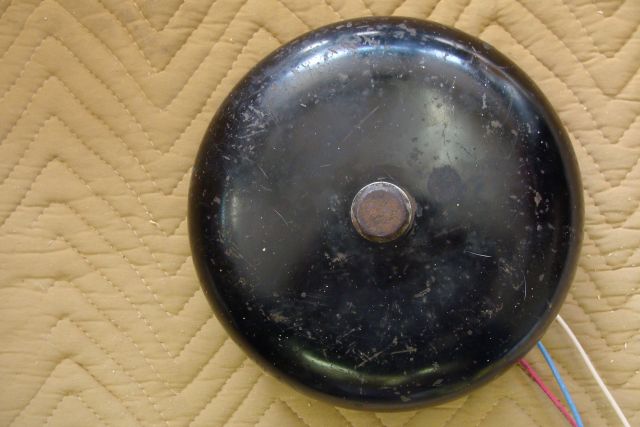
Dave has been working on rebuilding another MTC crossing signal bell unit with parts from two separate partial units. Rust, corroded contacts and wiring, bad capacitors and damaged coils have made this a very intricate and time consuming project. There are eight different sets of contact points that make the bell ring and in time with the flashing lights and it is pretty mind blowing the first time you open one of these up and see all of the components. It will be another month or two before this one is finished. If we have the right usable parts, we will rebuild a G-16 locomotive bell later in the year.
|
|
Despite the heat, we had a few visitors to the A & P this month. Marc Tiu and his wife Joy stopped by and Mark had the opportunity to operate the Tucson for the first time. His mother enjoyed several rides in the gon. Youngsters of all ages enjoy trains... Marc has assisted here on the A & P several times over the years with polishing targets and helping with finishing projects.
|
|
Rod Herman of Fifty Lakes, Minnesota visited the A & P for the first time. Rod is considering adding a railroad to a large piece of property he owns and is still exploring gauges, wheel profiles, various power sources and manufacturers. It was great having another railroad nut over and sharing thoughts about equipment and operational challenges. Rod engineered the Tucson during his visit which was his first exposure to 16 inch gauge equipment.
|
Saturday, May 9 is National Train Day. Please remember to support your local railroad museum, large scale railroad or railroad club. Donations help keep everything running and are the life blood of many of these organizations.
Happy and safe railroading everybody.
05/15/15
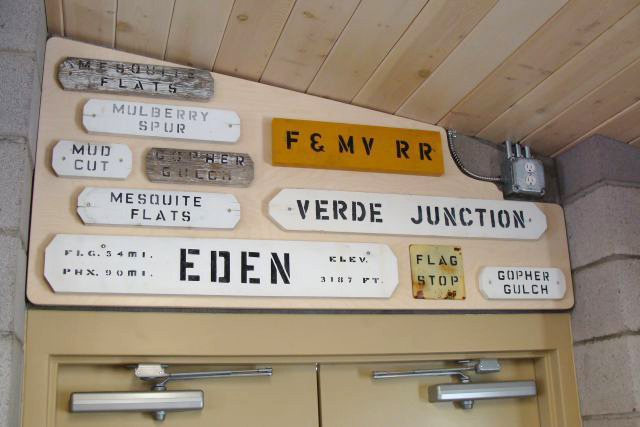
When the Flagstaff and Middle Verde Railroad was abandoned in August of 2012, I was able to salvage several of the signs from the railroad. I was able to save a couple of the original 1991 spur and siding signs from the bone yard and a few more of the 2007 signs from along the right-of-way. It has taken almost three years, but we finally have them mounted and displayed above stall No. 1 in the A & P engine house. I also salvaged one of the original short boards from the track inspection car seat. I trimmed it so that it would fit and added it to fill out the display. The ten signs are now protected from the elements and carry more than twenty years of fond memories for me of the F & MV RR and all of the things that were special about that railroad.
|
|
|
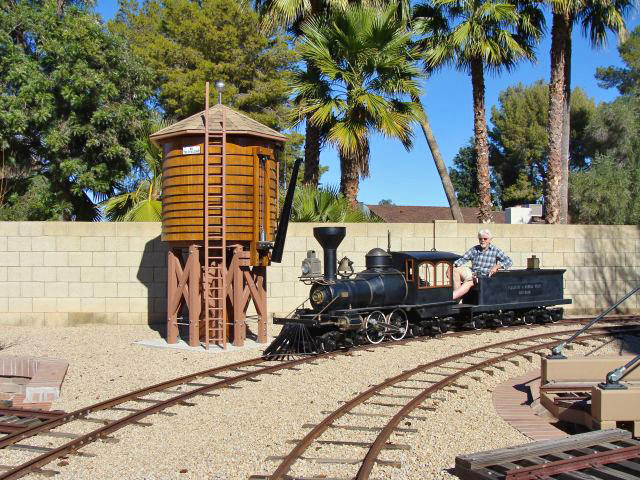
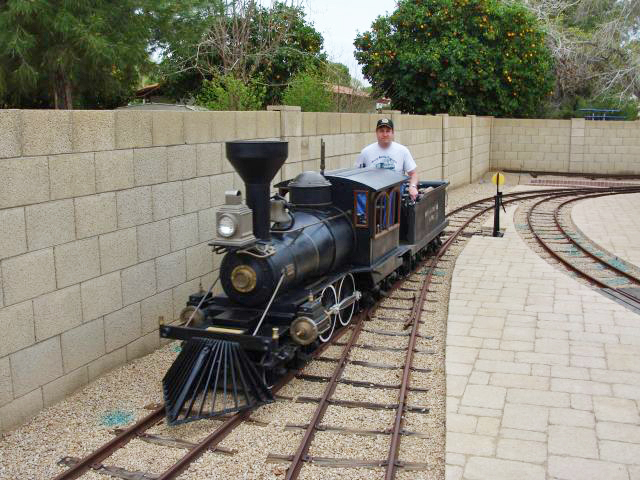
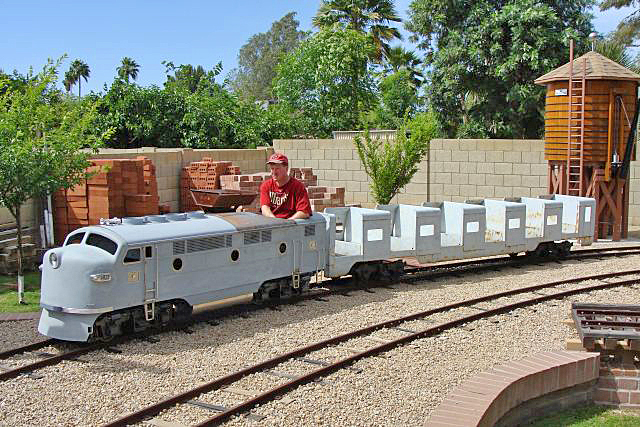
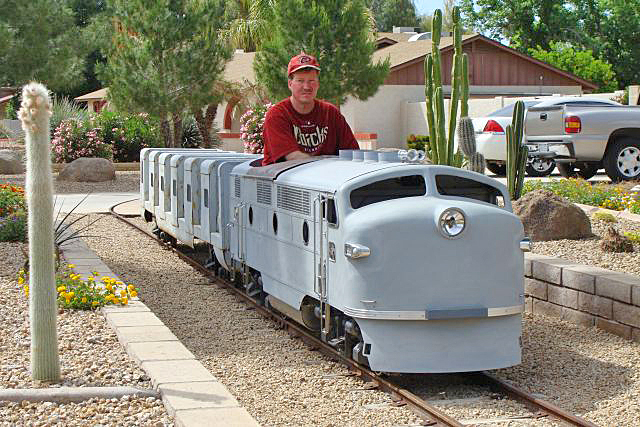
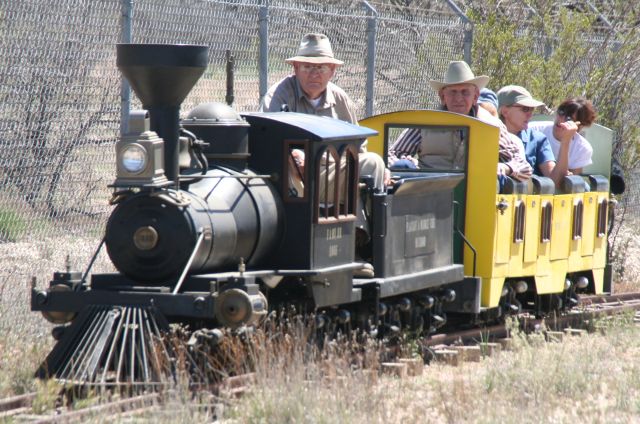
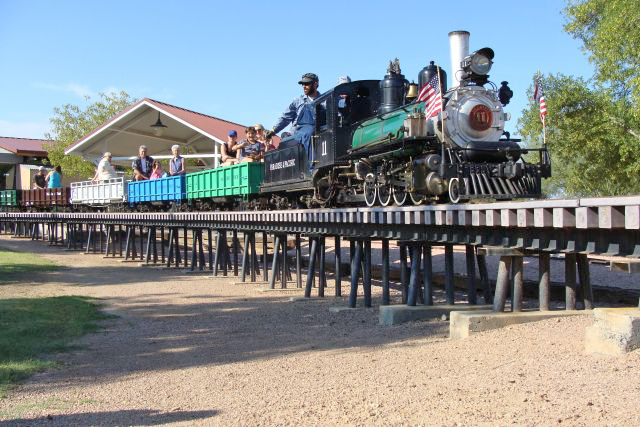
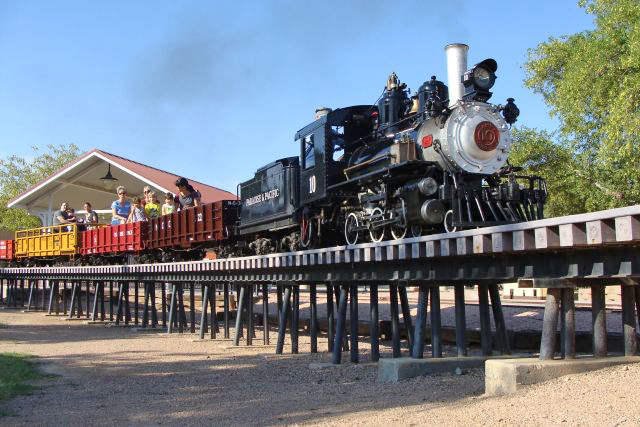
We had G16 No. 582 pull one of our G16 coaches around the A & P loop for the first time this month. We placed coach No. 582 behind the engine and made numerous laps around the track. That rebuilt Wisconsin engine and rebuilt gear boxes and transmission pulled the coach as if there was nothing behind her at all. The MTC Blomberg trucks sure do make for a smooth and comfortable ride. We took some video of both of us running the engine and later this summer we will edit and post a new video.
|
|
We also had the Coconino and gon No. 202 out on the mainline for several laps. We stopped out in the front yard and took a photo to update one on our main page from almost three years ago of the Coconino and gon 202 when the Coconino did not yet have its false drive wheels, its shortened stack, its new drive motors or its new drive gears. The location isn't exactly the same, but it is pretty close. Over the course of the summer, we will be updating several of the photos on our main pages as some have become somewhat outdated.
|
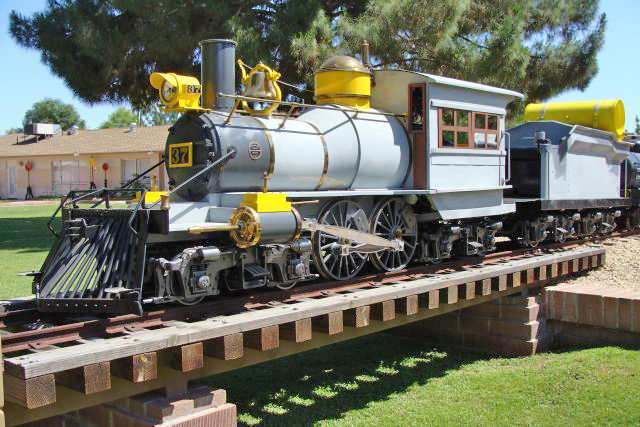
We had the Red River (No. 37) out for a little exercise and I had her spot the Mackey Oil tank car just behind trestle no. 3 for a few photo opportunities. I think she looks pretty good with that car and sitting there. You may see a few more shots from that location of other equipment in the near future. We currently have the Tucson paired up with gon 202 and the Coconino paired up with gon 712. I think they all look good together. I'll work on getting a few more photos next month.

|
|
We cleaned, lubricated and adjusted each of our switches and switch stands. The process only takes 10 -15 minutes on most switches to get everything adjusted and moving smoothly, but we do have ten switches and the better part of an afternoon was devoted to the project. There are times when the handle pin on the switch stand needs replaced and that adds a whole new element to the process, but we have become fairly proficient at that process over the years too.
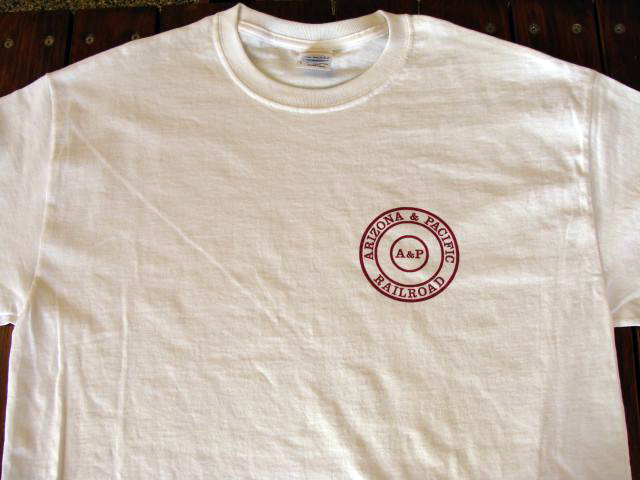
I have received inquiries about whether I will be selling A & P tee shirts and apparently some of the long time followers of the A & P would like to have one. That is very flattering and frankly I hadn't even thought about it. The folks that spend their time working our here were gifted at least one. I don't want to get into a situation of selling them and having to change sales tax and have all of that reporting and paperwork that goes with that. Let me think about it a little bit and think it through. Any of you that might be interested in a shirt or have ideas on how to do this, please let me know your thoughts.
|
|
For many years, our friend Jerry Graves owned and operated a Wisconsin sales and service franchise here in Phoenix. Now in retirement, he assists on the A & P, services engines for a handful of selected clients and when time permits rebuilds and modifies Wisconsin VH engines for use in MTC G16s. We have one of his VH engines in our G16 and in the Red River. We also have one of his VH rebuilds on our parts shelf. He also rebuilt the VF in the Coconino and the VF in the Tucson.
As many of you know, the standard VH will not replace the VF in the G16 even though the footprint is the same as the manifolds make it too tall for the hood to close. Jerry has modified another VH so that it will fit into a G16. This one is a complete rebuild with new pistons and rings, electronic ignition and all of the bolt on parts. I don't need a second spare at this point in time, so this one will be available. If you have a G16 and the Wisconsin engine is just worn out, contact Jerry Graves at 602-576-1172.
We had two sets of two local visitors each this month. The Tucson was placed in service for a few laps one evening after work for Craig and George. Unfortunately, they had already left before I realized that I hadn't taken any photos. That has only happened a few times in thirteen years - sorry guys, now you have an excuse to come back and visit again.
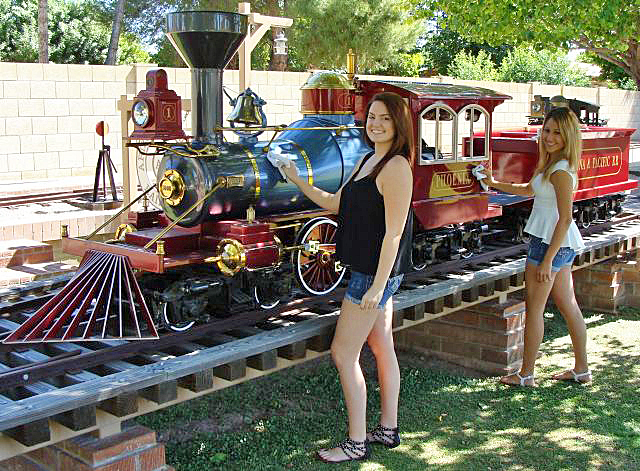
Amy and Bri both work in another department at my employer. They are two of the smartest, sweetest and hardest working young gals you ever will meet. They stopped by the Arizona and Pacific to see the railroad and were willing to be models for a few photos. We will add some of the photos of their visit to the monthly updates over the summer.
|
Happy and safe railroading everybody.
05/18/15
We posted a 3 minute video of G-16 #582 pulling a coach at the A&P RR to YouTube. You can see the video here: G-16 #582 pulling a coach on the A&P RR in April of 2015
06/12/15
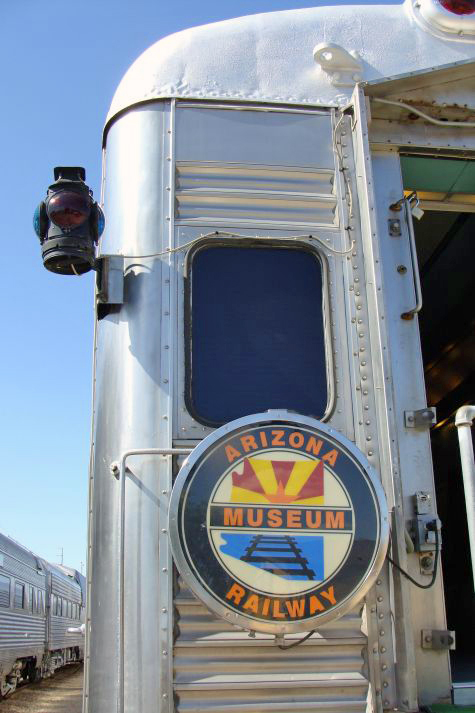
On National Train Day, I visited the Arizona Railway Museum in Chandler. I have been a charter member there since the early 1980s when the collection was a few books and magazines, five or six cars and an engine stored at a diary in south Chandler. As a charter member, I was able to assist financially at a critical time, but I have never been involved in any of the restoration or organization activities as the job, the A & P and other responsibilities have always taken the available free time. I have taken great satisfaction in watching what Bart Barton and his team have accomplished over the years in the acquisition and restoration of railroad equipment with ties to Arizona and the Southwest. I ran into Bart during this recent visit and he stated there are forty-three cars and engines currently on the property and he had leads and offers on several more pieces. Long term, the museum is hopeful it can acquire an adjacent piece of property and raise funds for an engine house.
|
|
I was particularly pleased to see roof and body work in process on the Desert Valley a car previously owned by one of my long gone friends Russ Joslin. I was in that car many times when Russ stored it in the west valley. It has a good home and will be getting fresh paint later this year.
|
|
The museum is far from static as displays and cars are constantly being updated and moved. You won't find a more dedicated or harder working group of railroad enthusiasts. If you haven't been to the museum recently, it is well worth a visit and please remember the donation box on the way out - I did.

|
|
|
|
|
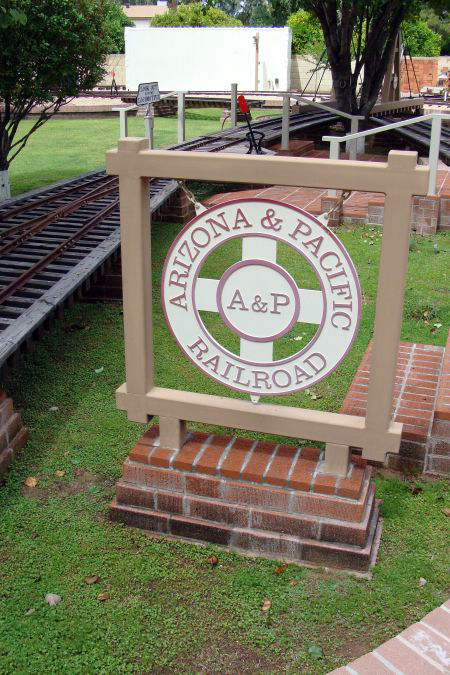
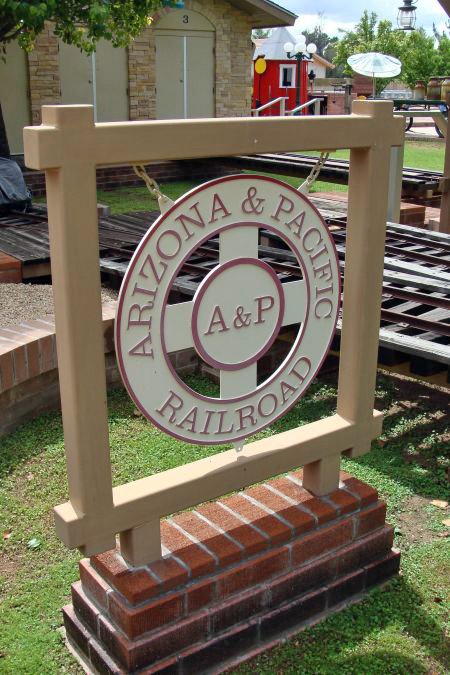
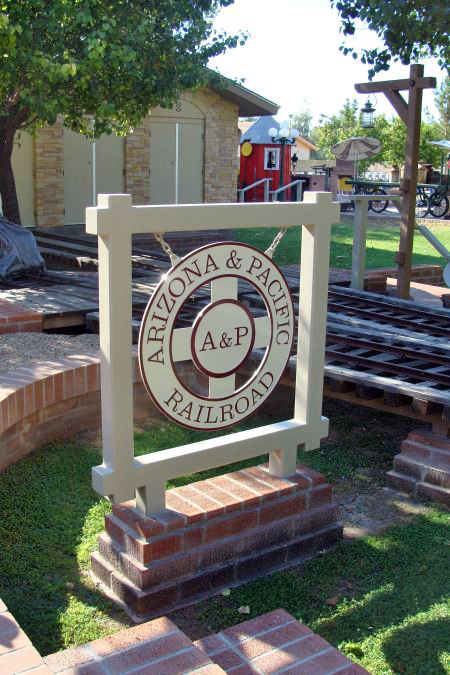
We originally hung our custom Arizona and Pacific Railroad logo sign in April of 2008. I can't begin to tell you how many hours originally went into laying out and welding the individual letters in place on our two sided sign and then grinding and sanding the welds prior to having the sign two color powder coated. Over the years we polished and waxed the sign, but the brilliant colors had faded and it was time to strip it and re-powder coat the sign.

|

|
We did make one change to the sign as originally we had three mounting tabs - two at the top and one at the bottom to keep the sign from swinging in the wind. The reality was the sign is so heavy it never blew in the wind and we never used the bottom tab so I cut it off and polished where it had been. The sign is made from 1/2 inch thick plate and weighs a ton. We took the opportunity to sand, prime and repaint the frame while the sign was at the vendor. The two color powder coating takes longer than a one color project as you might imagine; the sign should be ready for pick up next week.
|
Staying with the sign theme, I was anxious to finally get the F & MV signs mounted last month after almost three years, but after looking at my work for a couple of weeks the signs came down. I just wasn't happy with the way the main mounting board followed the shape of the ceiling. It was trimmed and rerouted and now the reveal more closely matches the angle of the ceiling and the curvature of the flex conduit up in the corner. I know, I may have been the only one that it bothered. Anyway, all of the signs are back up and I am happy with the now finished product.

|

|
It has been a while, but several months ago we made three heavy duty sign stands for three portable signs - a railroad warning and two whistle signs. I have procrastinated in finishing painting the signs, but I had the stands bead blasted and powder coated in semi-gloss black this month. I'll finish painting the signs this summer when it is 119 outside.
Years ago, we salvaged a light weight stand from a scrap dealer, cut a wood top for it and built a tray for parts and hardware and have used it in our engine house as a table and a hardware bin for small hardware specific to our railroad restoration projects. We added two more trays this month, a full size one for more hardware and a half size one for the various light bulbs that we utilize in maintenance along the A & P. It allows me to get all of that stuff in one place and not scattered among different buildings and storage areas. I also painted the top surface this month.
|
|
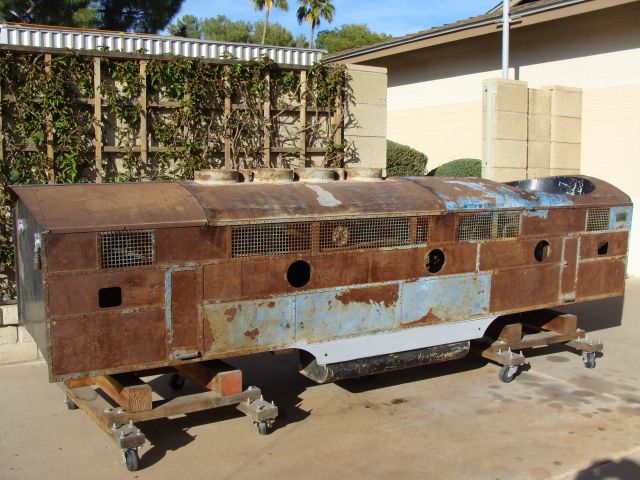
In preparation for bead blasting, we disassembled the B unit. We pretty much removed everything down to the sheet metal. We did leave the hood hinges attached as they can't be damaged. The two hood panels, cowl and both couplers off of the B unit went to the sandblaster last week and will be ready for pick up in the next few days. We'll get them all primed and ready to install once the main body is media blasted. I hope to get that done later in June and we can prime her and start working on the vacuum lines over the summer.
|
The cowl off of No. 582 also went to the media blaster last week. It is just a little bit too big for my bead blasting cabinet so it went along with the five other parts. I am looking forward to getting it back and permanently mounted.
|
We had the Tucson, Phoenix, No. 582, Red River and the track inspection car out and running during the month. It is so important to start everything every other week and move them all around a little bit even when it is 118 degrees to keep the fluids moving around, seals and leathers moist and batteries charged. It just makes life so much easier in October when the railroad is much more active and we want everything running well and as few issues after the summer as possible.
We got quite a bit of additional wiring completed on the John Deere ATM relating to the added turn signals and brake lights this month. We also added small front turn signals. We got the four turn signals and brake lights wired to a common location near the battery and mounted and wired the turn signal switch. We'll still be adding a fuseable link, flasher unit for the turn signals and a pressure switch for the brake lights, but progress was made.
|
Happy and safe railroading everybody.
|
07/06/15
As we expect out here in June, it has been a hot month. We haven't had any of the 118-122 degree days that June in the desert is famous for, but it has been 111-115 almost every day this month. Those temperatures mean less activity out here on the A & P. We still make some progress on the smaller projects, but the work days are shorter. We look forward to October.
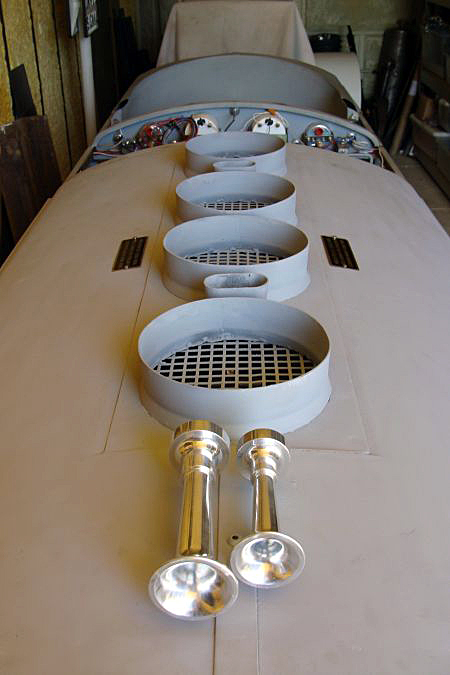
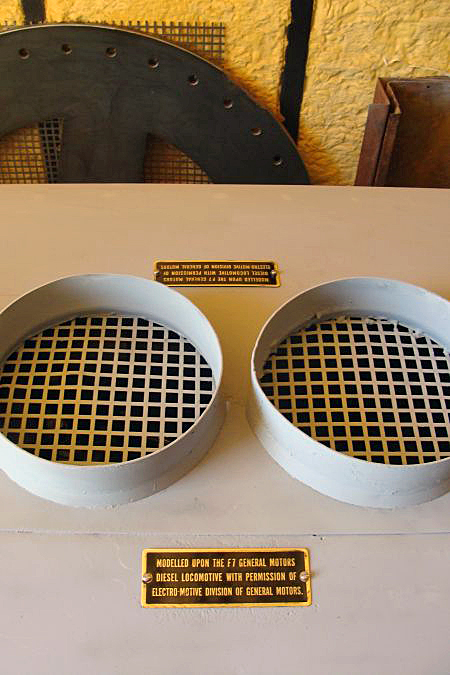
As I mentioned last month, the cowl off of No. 582 went to the media blaster as it is just a little bit too big for my bead blasting cabinet. I got it back this month and did some body work in a few places to get it roughed in. I am far from a great sheet metal guy, but I can get things roughed it half way decent for the guys that earn their living doing that type of work. I did some dremel work around our new screens and they look as good or better than the factory original screens on the B unit. I primed and painted the cowl and next week Dave and I will get it mounted. I think it will look pretty good on her. We will need to update the builder's photo of her once the weather isn't quite as hot out here.
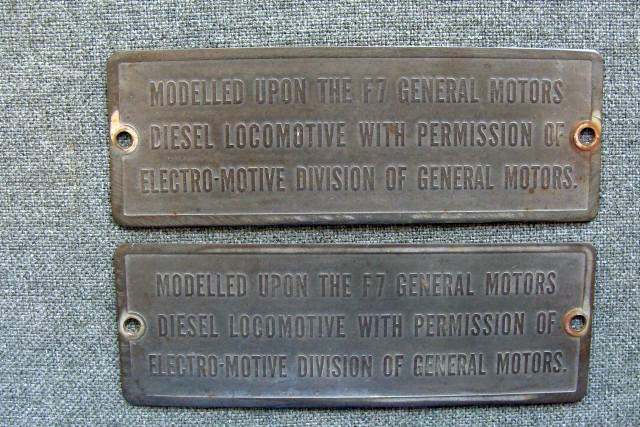
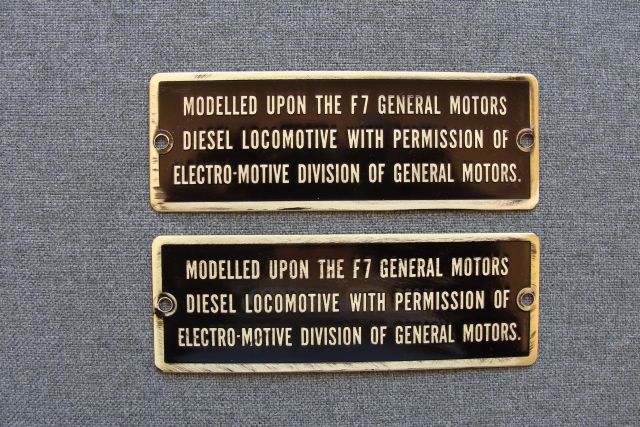
We located and refurbished our original "Modeled after the F7" hood emblems this month. They have lots of dings and scrapes which is expected as they sit right on top of the hood so they aren't as perfect as a reproduction set would be. However, it is just so cool to have the original ones and they look pretty good for being 62 years old. We do have a set of reproduction hood emblems that will go on the B unit when that time comes.
|
|
|
|
As I stated last month, prior to taking our primary Arizona and Pacific logo sign to the powder coater, I cut off the bottom of the three mounting tabs as it was never used. I ground and sanded smooth where the tab had been located. With the sign removed, we took the opportunity to sand, prime and repaint the frame. I couldn't find any original paperwork from when I had the powder coating work done originally and the vendor had changed computer systems a few years ago so we had to try and determine the original colors from the faded ones. The cream color we nailed spot on, the reddish burgundy color we had one notch too far toward burgundy and away from red to match our original colors perfectly, but it is pretty close and close enough that I am happy and the sharp and crisp colors are great to see. We got it remounted and I put a good coat of protective wax on it this month.
|
|
|

|
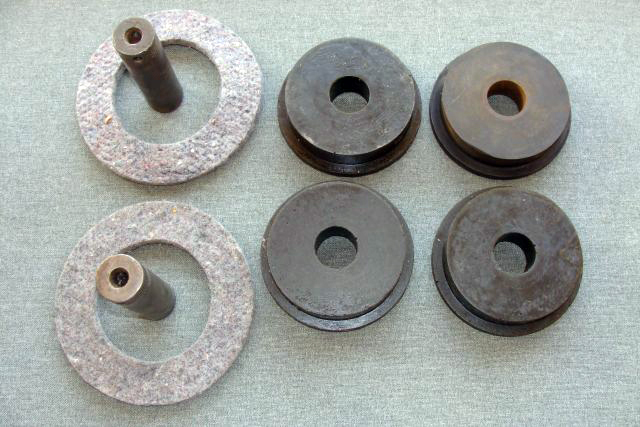
I located four new coupler shock absorber halves, two drawbar swivel pins and two body bolster felts for the B unit. I was actually looking for a different part for a friend and stumbled across these parts that we will need in the B unit reassembly later this fall so I set them aside in the shop where it is much cooler than in our parts storage building and I won't have to hunt for them out there later. The actual couplers have been bead blasted and I need to fabricate another hose bracket and those assemblies will be complete and ready for installation as soon as the B unit body is ready.
|
Several months ago we made two heavy duty sign stands for three portable signs - a railroad warning sign and whistle and slow signs (one post). I had the stands bead blasted and powder coated in semi-gloss black this month. I made some progress, but still haven't quite finished painting the signs. July and August are forecast as very hot months; hand lettering signs inside in the cool air sounds pretty good. I will get the signs painted and mounted in July or August. Two of the sign stands are displayed in the engine house and the third stand is temporarily stored in the shop.
We got quite a bit of additional wiring completed on the John Deere ATM this month. The tail lights are done and work great. The fuseable link will be added next followed by the flasher unit. Those additions will make the front and rear turn signals operational. The brake lights are not finished, but progress was made. We need to find a suitable pressure switch and get that installed and then we won't have much more to have that project completed.
For many years, our friend Jerry Graves owned and operated a Wisconsin sales and service franchise here in Phoenix. Now in retirement, he assists on the A & P, services engines for a handful of selected clients and when time permits rebuilds and modifies Wisconsin VH engines for use in MTC G16s. We have his rebuilt VH engines in our G16 No. 582 and in the Red River. We also have one of his VH rebuilds on our parts shelf. He also rebuilt the VF engine in the Coconino and the VF engine in the Tucson.
As many of you know, the standard VH has the same foot print as the VF, but is too tall (without modification) for in the G16 as the manifolds make it too tall for the hood to close. Jerry has modified another VH so that it will fit into a G16. This one is a complete rebuild with new pistons and rings, electronic ignition and all of the bolt on parts. I don't need a second spare at this point in time, so this one will be available. If you have a G16 and the Wisconsin engine is just worn out, contact Jerry Graves at 602-576-1172. The VH is several horsepower more powerful and you will appreciate the extra capability.
|
|
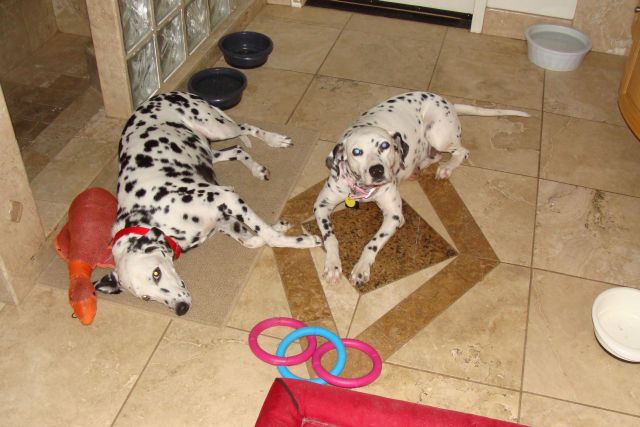
My Dalmatian Sedona passed this month. She was a great dog and had patrolled the grounds of the A & P for more than 16 years and kept the rabbits and birds from getting overly comfortable during her tenure. The patrol duties are now in the capable paws of Lodi my 5 year old Dalmatian. I may make an addition to the security team this Fall so that we are back to two patrolling for wascully wabbit activity.

|
Happy and safe railroading everybody.
|
09/08/15
It has been a long hot summer here. The heat coupled with this summer's irrigation schedule has resulted in very little railroad activity this summer. April through the end of October, I get irrigation water from the canal system pumped to my property every 14 days. The property was once part of a ranch and the water rights are grandfathered in which is great for the grass and trees. On irrigation days, I get 8 - 12 inches of water in the back yard. As long time viewers to the A & P website know, that is why the turntable, transfer table and the tracks are elevated by fill or by trestle - to elevate everything above the water line.
I don't get to select the days and times that the water arrives. The day of delivery rotates every year. This year my water has been arriving on Saturday - sometimes as early as mid morning and some weeks as late as 10 P.M. The upshot of all this is that our primary work and run day on the A & P is always Sunday and with the back yard filled with water every other Sunday, that day has been off the calendar this summer and the Sunday in between has just been hot. Working on minor projects out back on irrigation days is difficult as the heat combined with the humidity from all the nearby properties also being filled with water has sweat dripping from your forehead like water from a faucet. It definitely isn't a dry heat out here on irrigation days! The last week of October, irrigation goes to once every 28 days and January to March the system is dry for maintenance and the winter.
We didn't have an A & P update last month as there just wasn't anything of substance to add. That isn't to say that I have spent all summer in a recliner. There was the usual charging of batteries, right of way maintenance, checking of fluids, attention to grease fittings etc. The general grounds maintenance is far more demanding in the summer. In addition to all the fertilizing, watering, trimming, mowing, weeding, spraying and pool maintenance, I stayed plenty busy with unanticipated projects. We rebuilt my garage door opener as it decided to quit working. I replaced valves and rebuilt a sprinkler manifold here and one at my mother's house. I replaced a sink in the master bathroom and all the associated plumbing. I replaced a hose bib and the list goes on and on and on - just not interesting for you to read about.
I finally did finish a couple of very small A & P projects. Several years ago, my office was near a facility that dipped items instead of media blasting them. They did great work and over a period of two or three years, they dipped probably more than a hundred items for me with great success. As long as your entire item that is being dipped is all the same metal it is the way to go. It gets a little more complicated when your project is comprised of different metals and disassembly isn't possible or practical. The tender on the S16 is primarily steel, however, the rear curved upper corners are an aluminum casting. Also the chassis for the locomotive has a serial number tag that is aluminum. I had a couple of tenders dipped previously and they dipped them in such a way that the aluminum corners stayed above the acid and they were cleaned with a solution specifically mixed for aluminum. The same with the chassis and its serial number tag. It was suspended in the acid twice - from each end and with the tag always above the acid. It was cleaned with a much milder solution.
This time, the day started routinely, I dropped the parts off for dipping and reminded the owner about the aluminum components. Later, while he was at a local restaurant having lunch, an employee submersed both the tender and the engine chassis all the way into the pool of acid. Both the tender corners and the chassis tag disappeared. As you can imagine, I was not very happy. Even if patterns were made and with new castings, the tender would have to be disassembled to install the corners.
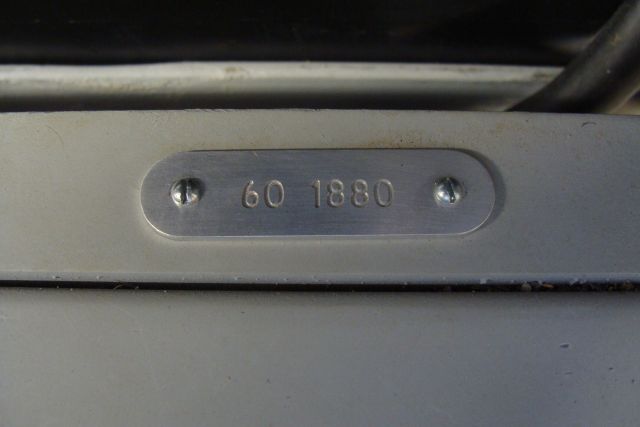
The owner of the facility was not any happier than I was. He paid to have fiberglass corners crafted in place for the tender that match the originals perfectly except there isn't a seam and rivets where they meet the tender body. He also paid to have a duplicate serial number tag made that was identical to the original. The tag is small and over the years it has been lost and found here in my parts bins and buildings a half dozen times as I have placed it different places for safe keeping. Several weeks ago when I was looking for the hood emblems for the G-16, I stumbled across it again and instead of putting installation off and maybe misplacing it again, I decided it was time to get it mounted on the Sandusky where it belonged. We finally got it mounted and it looks good.
|
|
|
When the weather gets reasonable here in mid to late October, we hope to get busy with our G16 B unit project. To that end, I located and dug out the two couplers and made a metal hose loop to match the original one that probably was removed and used on one of our prior projects. With some paint, it will look just like the original one.
|
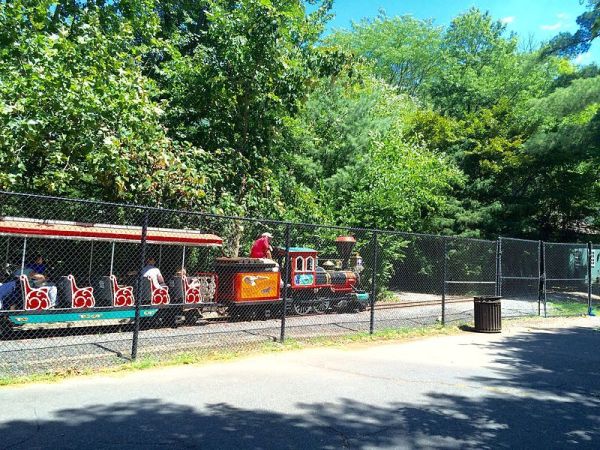
A long-time visitor to the website and Allan Hershell S24 fan, Ryan Griffin, submitted a very nice photo he took of the S24 running at Van Saun Park in Paramus, NJ. You can see that photo below and we have also added it to the "friends of the A&P" photo gallery found here
|
We also received a couple of nice photos from Greg DeLaat of the S16 running at the Memphis Kiddie Park in Brooklyn, Ohio. You can also find his photos in the photo gallery. We are always looking for S16 and S24 photos to add to the gallery - thank you both very much.
|
|
As I mentioned in July, my Dalmatian Sedona who took great pride in patrolling the grounds of the A & P for 16+ years passed recently. My five year old Dalmatian Lodi, enjoys being a teammate more than patrolling solo. To that end, we adopted a 10 month old female Dalmatian rescue last month named Lizzie. There is no shortage of energy or enthusiasm, she is very much a work in progress, however.... Any of you with puppies and shoes, socks, rugs, pillows, stuffed toys, trash bins etc. know just what I mean.
|
Things start to crank up next month out here in the desert. Railfair at McCormick Railroad Park is October 10 and 11, the Maricopa Live Steamers resume activities as do the Joshua Tree and Southern folks. We might even blow the dust off of some equipment on the A & P if the weather cooperates.
Happy and safe railroading everybody.
10/17/15
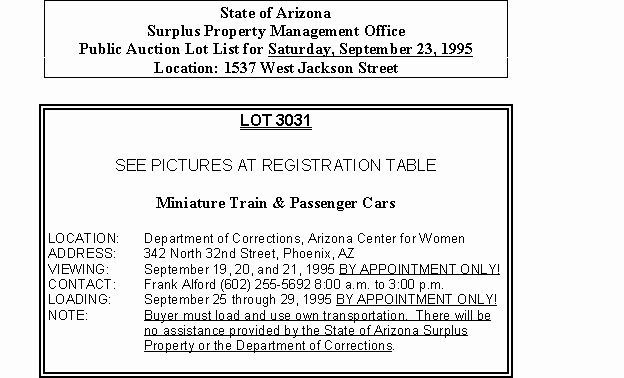
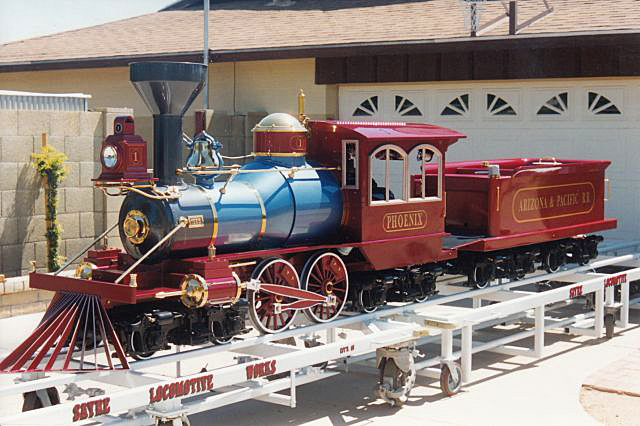
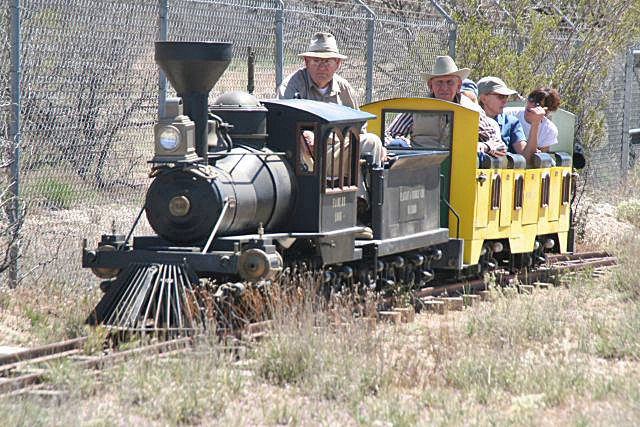
It is hard to believe that it has already been twenty years (Sept. 23, 1995) since that Saturday morning when Dave, Malcolm and I attended an auction and acquired the S16 that we would later name the "Phoenix". The train was included in a State of Arizona surplus equipment auction and Malcolm drove down from Flagstaff and Dave in from Gilbert to make sure that we ended up with the high bid. After some spirited bidding, we owned her and had a week to remove her from State land.
|
The train had sat in exactly the same place for so many years that the wheels were rusted to the rail. Rust, dirt and grit were everywhere; nothing would move. WD-40 was applied liberally to virtually everything as each part that we removed fought us to the last very last thread. Dave and I spent a full day lubricating and removing parts. After hours of work, we finally freed her up and she would roll - not easily, but with considerable effort she would move. Some friends that worked for a local towing company arrived with the heavy equipment for the move later that evening. That night she was sitting in my garage. I owned an Allan Herschell 1865, but she was in awful shape. The list of damaged, missing and worn out parts was longer than the list of parts in good shape. I had no track, no spare parts and no clue... It didn't matter, I was thrilled to own her.
|
|
|
|

|
|
Dave and I had met Malcolm Mackey at his Flagstaff and Middle Verde Railroad a couple of years earlier and I was hooked on the equipment after having the opportunity to operate his train and assist at several "open house" events at his railroad. Each time I visited the Verde after I acquired the Phoenix, I spent hours measuring, photographing and drawing the parts I was missing and asking questions about how assemblies operated and came apart. There were hundreds of parts on the DMWO (damaged, missing or worn out) list. Many of the drive train parts were interchangeable with Miniature Train Company G16 parts and I began calling and writing letters to other train owners. I asked about sources for parts, any extra parts that they might have and be willing to sell and common repairs. Most people were very helpful and I only got shafted a couple of times with parts that I purchased that were worse than the ones I was trying to replace...
|
Some of the 1865 specific parts were still available from Chance Manufacturing back in those days and they found me a headlight, headlight platform, mounting horns and a set of blue prints among other things. They took very good care of me when I had no idea what I was doing. I learned a great deal as time went along. I started meticulously disassembling, cleaning, labeling and bagging every part.
I set about finding, rebuilding, fabricating or having fabricated every single part that I was missing. It was a huge undertaking and at times felt overwhelming. Every time I thought maybe I had made a huge mistake, I headed back up to the F & MV and got recharged and excited about my project. It took a great deal of persistence over more than five years to get her all of the way rebuilt and back together. I acquired a twenty foot cargo container to store the Phoenix and we had just enough track for the train to fully exit the container. For several months, we could only move her back and forth a few feet as I tracked down used rail and designed the layout of the future A & P.
|
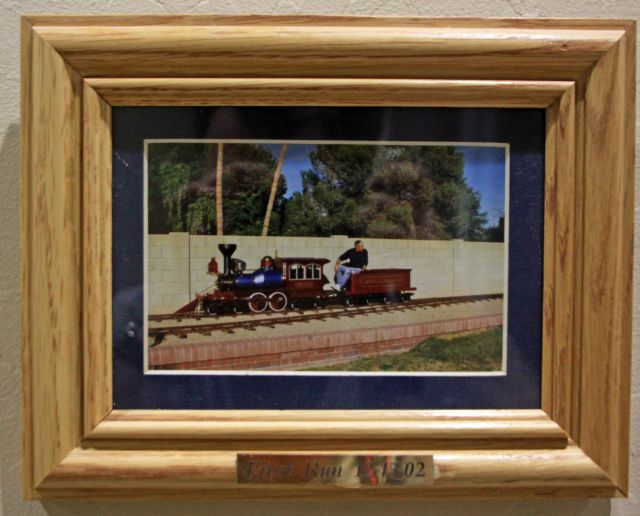
We acquired used rail in small quantities in many locations and acquired hundreds of tons of dirt and fill to elevate the railroad grade from a company that dug holes for new swimming pools. There were long stretches when we spent more time moving dirt and rock than we did on the railroad equipment. Finally, by late 2002, Dave and I had two switches and maybe three hundred feet of track on the ground. On December 15, 2002, the Phoenix made her first run on the A & P. The travel was backwards out of the engine house and down the mainline as we didn't have a loop or a turntable at that time. It still felt great to actually give her a little throttle and let her run a little bit - even if the first few hundred feet were backwards. Dave took a photo of that event that I have had up on the wall in my office for many years showing the rebuilt Phoenix rolling for the first time across a stretch of straight mainline in the backyard - backwards. At the end of the rail, I stopped and retraced the route going forward. That was the route for many months - back and forth or a point to point railroad as I liked to call it...
|
|
|
Since then, we have acquired and rebuilt five additional engines (4 more S16s and a G16), built a couple of cars from scratch, rebuilt several more, added several hundred feet of tracks and sidetracks, a turntable, water tank, engine house and more to what became the A & P railroad. We have had the opportunity to share the railroad with hundreds of people over the years in person and thousands more through the website and our monthly updates. As I look back, it is hard to imagine not going down this path...
We had a hot September out here and not much actual railroading took place this month as it has still been well over 100 degrees. We did have the track inspection car out and running around the sidetracks in the back yard a time or two. I am so happy with the padded seat as it makes operation so much more comfortable. We also had the Sandusky out and running for the better part of an afternoon. It had been quite a while since she had been out of the engine house. She ran great and seemed to really appreciate the opportunity to get out and run a little bit. We lubricated and adjusted a switch and switch stand, adjusted a few ties and tightened a few tie plates. Next month, I hope to get the balance of the girls out and running for the first time since May for some of them.
|
Happy and safe railroading everybody.
11/16/15
The annual run season on the A & P officially starts the weekend after McCormick-Stillman Railroad Park's Railfair celebration. Railfair is always the weekend of the second Saturday in October. This year it was October 11 and 12 and once again it attracted a huge crowd. Steam engines No. 10 and No. 11 provided the motive power for the two trains that were operating. The trains were full until late in the day when some empty seats were observed. The engine house was open for tours and several specialty cars that are normally not accessible to the public were also on display.
|
|
|
|
The Scottsdale Live Steamers were providing rides to the public and there were also several pieces of private equipment operating over the SLS tracks. It has become a tradition to ride both the 15 inch and 7 1/2 inch each year at Railfair going back to 1992 or so.
|
|
After just sitting most of the Summer, it takes a while to get all of the Arizona and Pacific equipment running again. I charged all of the batteries, but the Tucson and Coconino batteries just wouldn't hold a charge so I purchased two new batteries. The Tucson has always been an easy starting engine. We installed the new battery and cleaned the carburetor jets and she turned right over. We let her run for awhile and then took her for several laps and she ran great.
|
The Coconino has always been a bit more cold blooded and difficult to get started after sitting for even a few weeks. We installed the new battery and to my surprise she turned right over and started. She was a little rough at first, but smoothed out after a few minutes. I took her on a few laps, but there is a fuel issue. I am leaning toward the fuel pump, but a clogged filter or fuel regulator are also candidates. We wanted to get an many pieces of motive power running as possible so the Coconino will have to wait until we can spend a little more time and finish diagnosing her issue.
|
The Phoenix still had a mechanical fuel pump installed in 2000 and it was acting up intermittently. We had one low output electric fuel pump and filter on the parts shelf and we installed them on the Phoenix. She started right up and ran great. We ran several laps and with the exception of a problem with the transmission shifter that we resolved she ran great.
The Red River battery was fine, but the choke and carburetor jets needed attention. After cleaning and some adjusting, she was also running smoothly.
|
Our G16, No. 582, was the easiest one to get started. She turned right over and ran pretty well. We sped up the idle just a tiny bit and she just wanted to run.
|
Ken Kinsley of Redstone, Colorado was in town and stopped by the A & P this month. He is considering building a railroad of his own and it was a fun visit discussing various aspects of owning and running park size equipment. He took a few laps at the throttle of the Tucson.

|
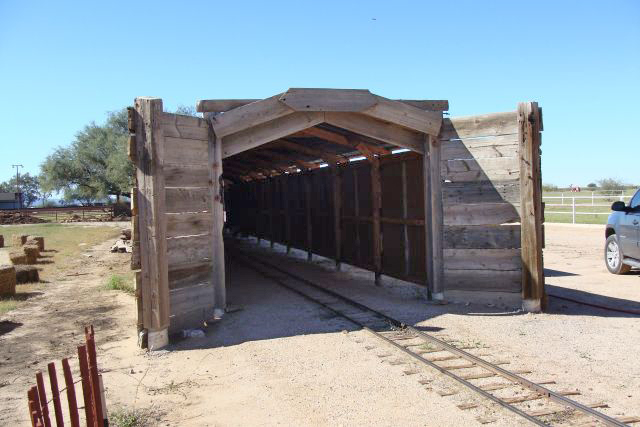
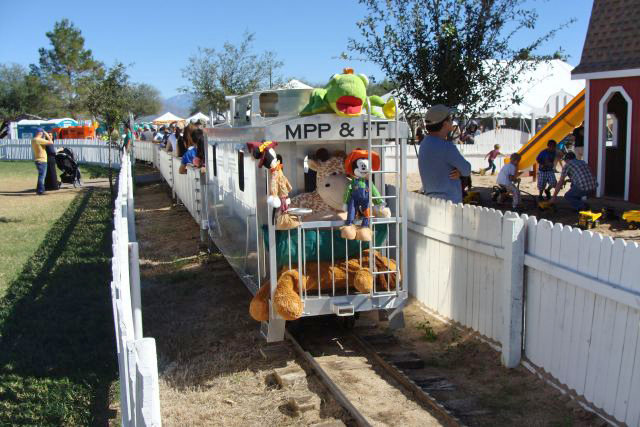
The last Saturday of October was Halloween and early in the day I traveled 115 miles south to the small town of Marana. I had heard of a park scale train operating at a pumpkin patch and farm festival on a large local farm that only operates in October of each year. I had heard rumors about a train in Marana three or four years ago, but didn't know anyone who had actually been there. Last year, one of Dave's step sons was there with a church group and took a photo of the train and track so I knew it was legit and park scale. Alex and Dave provided the address and I went down to take a look and get a ride myself.
|
The railroad is called the Marana Pumpkin Patch and Farm Festival Railroad. They run two trains on what appears to be 15 inch gauge, 12 pound track. They run through a wooden tunnel and loop many of the fall themed activities. My ride took about nine minutes and I am estimating the length is about 3/4th of a mile.
|
One of the trains is comprised of aluminum gons and an aluminum caboose built in Don Guill's shops. The seats have been padded and upholstered and it made for a very comfortable ride. The caboose was decorated for Halloween. The coaches of the second train were lettered for the New York Central and reminded me of several coaches John Wood's had in storage eight years ago.
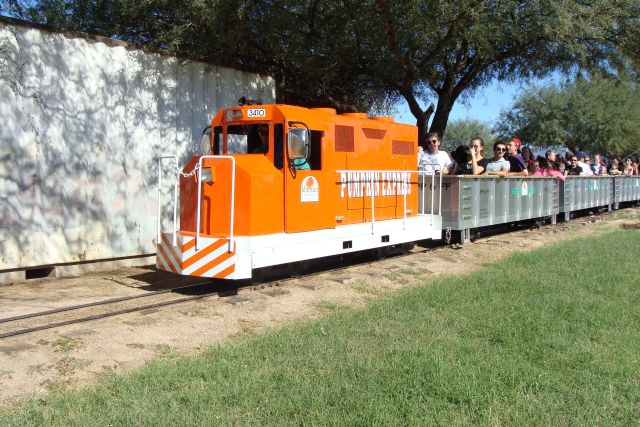
|
|
Both engines were diesel powered, but it was very difficult to get an up close look. The one had a Custom Locomotive look to it, but that is unconfirmed.
|
I couldn't find anyone who knew details about the train operation or equipment. I have written the owner of the farm and hope to get clarification on several questions and I will update our "Guide to Arizona's Miniature Railroads" and add the MPP and FF RR. Maybe next year, I'll fire pumpkins from the air cannon and try the zip line; they looked like fun too!
|
Happy and safe railroading everybody.
12/10/15
We located a new low output electric fuel pump for the Coconino. We removed the fuel regulator and changed out the filter and the pump. The early results seem to be positive, but I haven't run her much. I need to get a few more hours on her next month and make sure that we have resolved the intermittent fuel problem.
|
We had a warm Fall weekend on November 21 and 22 which allowed for visitors and rides on Saturday and a good workday on Sunday the 22nd. The Phoenix and Tucson both saw plenty of action on Saturday with gon 219 behind the Phoenix and gon 202 following the Tucson. All the equipment performed well. Three year old Aria had a ball and may have a future in railroading...
|
|
|
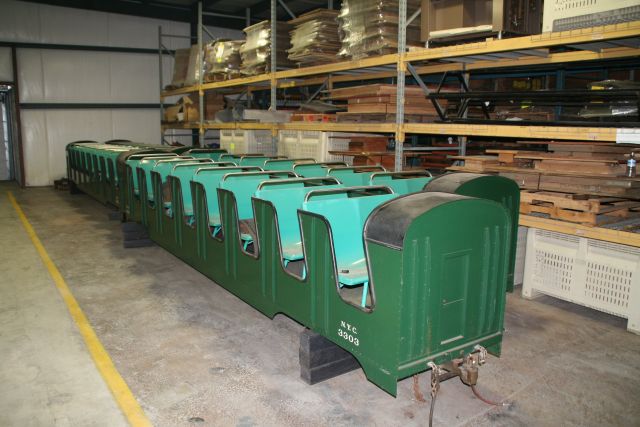
The majority of our work time this month was spent on our S16 coach, the Verde Vista. The coach has been buried in the back of our railyard with parts stacked on top of her for more than 3 years.
|
She originally ran at the Hiway House Hotel in Tucson. She was acquired by the F & MV on Sept 9, 1974. She sat in storage for twenty plus years on the Flagstaff and Middle Verde before she was moved into the shops there. She was shortened by four feet (2 seats) and the end platforms and bulkheads were rebuilt. One of the seating compartments was lengthened for taller or less flexible passengers. Removable padded seats were added. She entered service on the Flagstaff and Middle Verde Railroad on April 5, 2008. She ran at many open houses on the F & MV in first class service between April of 2008 and August of 2012 when she joined the rolling stock of the A & P RR.
|
|

|
|
|
When the Verde Vista ran on the F & MV, we had constant challenges keeping the four classic Allan Herschell coach lights working. One day they would work fine and a few days later they would work intermittently or not at all. We never had the time to really deal with the wiring in the proper way. Dave and I got the Verde Vista up on the A & P transfer table this month so we could look underneath and gain access; what we found wasn't pretty. Some of the original 1959 wiring was still in place, there were numerous splices and there was newer wiring of various sizes in random locations.
Originally hard wired at the coupler, Malcolm had installed a phonojack so he could easily couple and uncouple the Verde Vista and its electrical when she was placed in or taken out of service. It was a great idea, but just wasn't the ideal type of connector.
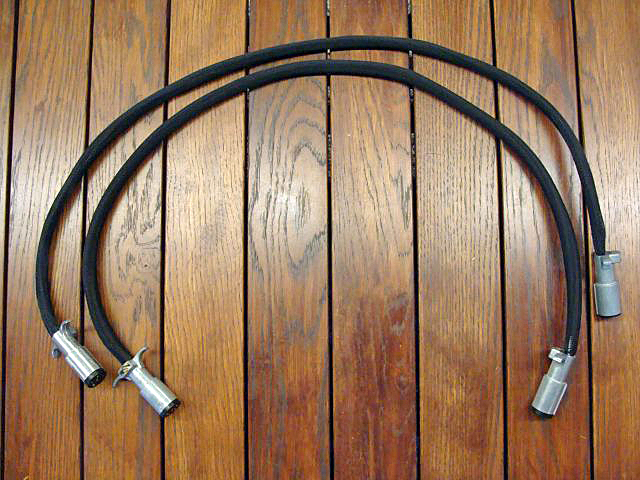
When the A & P acquired the coach, I knew the electrical was an issue. It hadn't been a priority on the F & MV and frankly it wasn't on the A & P when we first acquired her either. After getting a good look at the wiring, Dave and I decided to start from scratch. Dave rewired the entire coach from end to end. We eliminated the phonojack and installed a 6 pin trailer connector on the front sill. We built a pig tail electrical connector for connecting this car to its motive power. We can pull the Verde Vista with any of our five S16s and the electrical connections are all consistent.
|
Three of the coach lights on the Verde Vista were upside down so that needed rectified. We also swapped out a red for a green lens in another coach light so now all the lenses are the correct colors and positioned correctly. They are very bright at night, but it would be nice to have something brighter that you can see during the day. I'm not sure what is available, but Dave is researching the internet.
|
We also changed out the hard plumbed vacuum hose on the Verde Vista for a new quick release coupler. The Phoenix and Sandusky use one type of quick release coupler and the Tucson and Red River use another. Instead or changing out several perfectly fine quick connectors, we built two new connecting hoses with one end that matches up with the Verde Vista and the other end of one hose matches the Phoenix and Sandusky and the other hose matches the Tucson and Red River. It doesn't matter which piece of motive power is pulling the Verde Vista the brakes are fully functional. The Coconino has dynamic brakes.
Any of you familiar with the S16 coaches know the original design had a scaled rear platform with three small scaled steps on either side and a handrail made of much too lightweight material. After a few years of use, the steps were frequently bent and the handrails were mangled or missing. The rear platform and handrail were rebuilt on each end of the Verde Vista with heavyweight material by the F & MV shops.
|
|
The F & MV shops also added 1/4 thick plate bulkheads on each end of the car. We removed those bulkheads. Each one of the bulkheads weighed 53 pounds. We plan to add a cosmetic panel and an electrified drumhead to the rear end of the car and a lightweight cosmetic sheet metal panel to the front end. Dave ran the extra wires for the drumhead so once we get to that, the wiring is already in place. It will be illuminated when the coach lights are on.
|
Another cosmetic change we made was adding additional coach windows to the B side of the Verde Vista. Originally the car had 12 windows on the B side and 6 on the A side. The F & MV shops reduced that number to four on both sides of the car. They look fine on the A side. We had some extra coach windows on our parts shelf and added four additional coach windows to the B side to be a little more consistent with the original look. The B side now has two sets of four windows with room for the logo in the middle in between the sets of four. The Verde Vista name will appear on the center skirt and the coach number will be on the small skirt to the right.
|

|
You might be wondering why the Verde Vista was shortened in the first place as it was a great deal of work. She was originally shortened to be more consistent looking with the length of the engine and tender and to have less track overhang on tight curves. On tight curves with long cars, the middle of the car is well to the inside of the track which isn't an appealing look. The shorter the car, the less it is an issue. The F & MV had and the A & P has tight curves.
|
There is still a great deal of cosmetic work to complete on the Verde Vista, but the brakes and electrical now work reliably and the upholstered seats are comfortable. It's a good start.
Happy and safe railroading everybody.